
Requirements
Check these before you start — each one causes a build failure if it is not met:
| Requirement | Value | Where |
|---|---|---|
minSdkVersion | 21 to build; Reteno is functional from 26 | project level build.gradle (ext.minSdkVersion) |
| Java compatibility | 1.8 | app level build.gradle, compileOptions |
| Core library desugaring | enabled | app level build.gradle — see Enable core library desugaring |
| Repositories | mavenCentral() | project level build.gradle |
On minSdkVersion. Two different numbers matter here, and they are often confused:
- API 21 — what you need to build. The SDK artifacts (
com.reteno:fcm,com.reteno:push,com.reteno:core) declareminSdkVersion 21. Integrating Reteno does not force you to raise yourminSdkVersionor drop support for Android 5.0–7.1 devices. The app compiles, installs and runs there. - API 26 — where Reteno actually works. The SDK guards its entry points with an internal OS version check and does nothing below Android 8.0. On such devices
RetenoFirebaseMessagingServicereturns immediately fromonCreate,onNewTokenandonMessageReceived, so the push token is never registered and incoming pushes are never processed. The same guard applies across most core operations.
In practice: users on Android 5.0–7.1 can run your app normally, but they will not be registered as Reteno contacts and will not receive Reteno push notifications. There is nothing to configure or test on those API levels — the behaviour is intentional and cannot be enabled.
Set minSdkVersion 26 if your product does not need to support older devices. Keep a lower value if it does, and treat Reteno as unavailable below API 26.
Getting started with Reteno SDK for Android
- Install
reteno-react-native-sdk:
npm install reteno-react-native-sdk- Add mavenCentral repository in your project level
build.gradle:
buildscript {
    repositories {
    mavenCentral()
    }
...
}- Add
retenoandfirebasedependencies in application levelbuild.gradle:
dependencies {
    implementation 'com.reteno:fcm:2.10.1'
    ...
    implementation "com.google.firebase:firebase-messaging:23.1.0"
    implementation "com.google.firebase:firebase-messaging-ktx:23.1.0"
}
Pin
com.reteno:fcmto the version bundled with yourreteno-react-native-sdkrelease —2.10.1forv2.2.0. The React Native SDK already declares this dependency internally. If you declare a different version, Gradle resolves to the higher of the two and silently swaps the native SDK underneath the React Native bridge for one that was not tested against it. The bundled version for each release is listed in the setup overview.
| Library | Description |
|---|---|
| com.reteno:fcm | FCM enables push notifications through SDK and all core functionality |
| firebase:firebase-messaging | Firebase cloud messaging |
| firebase:firebase-messaging-ktx | Firebase cloud messaging Kotlin extensions |
Setting up SDK
Follow our setup guide to integrate the Reteno SDK with your app.
Step 1: Enable androidx in your gradle.properties file
android.useAndroidX=true
android.enableJetifier=true
Step 2: Set the Java compiler version
Java 1.8 compiler is required. In app level build.gradle:
android {
    compileOptions {
        sourceCompatibility JavaVersion.VERSION_1_8
        targetCompatibility JavaVersion.VERSION_1_8
    }
}
Step 3: Enable core library desugaring
The Reteno SDK uses Java 8+ APIs that require desugaring on older Android versions. Add this to your app level build.gradle:
android {
    compileOptions {
        sourceCompatibility JavaVersion.VERSION_1_8
        targetCompatibility JavaVersion.VERSION_1_8
        coreLibraryDesugaringEnabled true
    }
}

dependencies {
    coreLibraryDesugaring 'com.android.tools:desugar_jdk_libs:2.1.5'
}
Skipping this step produces a build failure similar to:
Dependency ':app' requires core library desugaring to be enabled for :app.Step 4: Initialize SDK in React Native code
Starting from reteno-react-native-sdk v2.0.0, Android SDK initialization is done from JavaScript via initialize(...).
No custom MainApplication integration is required for the basic setup.
Call initialization once in your root component:
import { useEffect } from "react";
import {
  initialize,
  initializeEventHandler,
  registerForRemoteNotifications,
} from "reteno-react-native-sdk";

useEffect(() => {
  const bootstrap = async () => {
    await initialize({
      apiKey: "YOUR_SDK_ACCESS_KEY",
      isDebugMode: false,
      pauseInAppMessages: false,
      sessionDurationSeconds: 900,
      lifecycleTrackingOptions: {
        appLifecycleEnabled: true,
        foregroundLifecycleEnabled: false,
        pushSubscriptionEnabled: true,
        sessionStartEventsEnabled: true,
        sessionEndEventsEnabled: false,
      },
    });

    initializeEventHandler();
    await registerForRemoteNotifications();
  };

  bootstrap();
}, []);
When you add push listeners, register them before
initializeEventHandler(). That call flushes the native event queue, and anything registered after it misses events that were already queued — including the push click that launched a terminated app. See Push notification.
Step 5: Set up your Firebase application for Firebase Cloud Messaging:
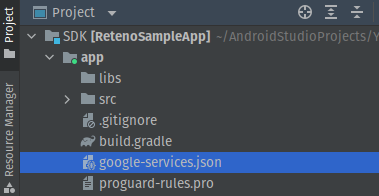
-
Download your
google-services.jsonconfig file (see how here). -
Add the above file to your root
app/folder.
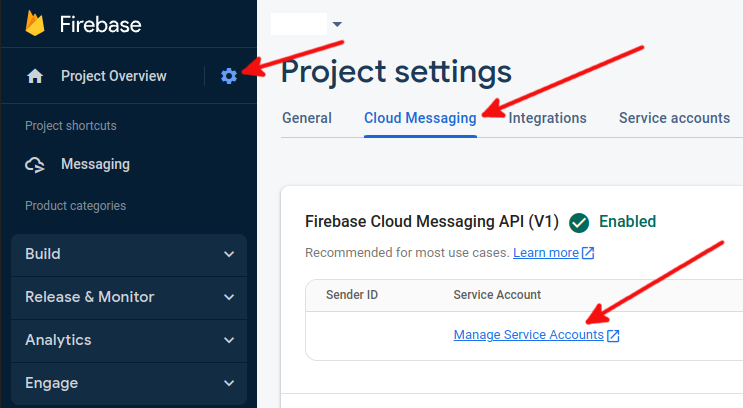
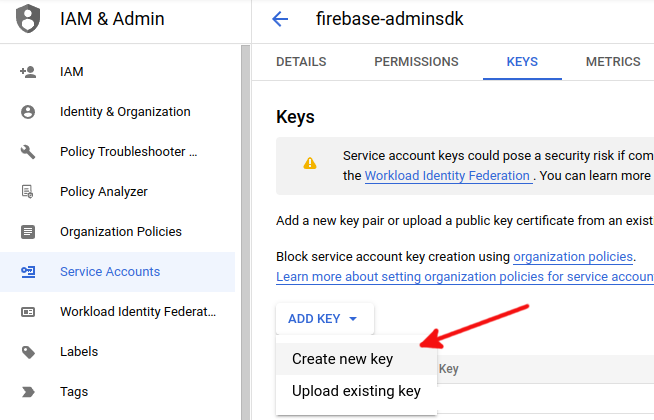
- Copy your FCM Server Key. In the Firebase console, click the gear icon next to Overview, then click Project Settings->Cloud Messaging -> Manage Service Accounts. Go to Service accounts to download FirebaseAdminSdk account's json key.

- Follow this manual to set up Yespo admin panel with your Firebase key.
Now you are ready to run your app and send a marketing push notification to your application.
Run your app on a physical Android device to make sure it builds correctly.
Step 6 (optional): if you already use a custom Firebase Messaging service
If you already use Firebase for Remote notifications and would like to use Reteno as well, you need to Create a custom Messaging Service Class:
In your project folder, create a new Java Class file, you can choose any name for it, we'll use CustomMessagingService.java for the convenience.
And put those contents in this Class. Basically, we override the MessagingService that is provided by firebase, by a custom one, that's extended from RetenoFirebaseMessagingService.
package com.reteno.sample; // <-- make sure to replace it with your package name

import androidx.annotation.NonNull;

import com.google.firebase.messaging.RemoteMessage;
import com.reteno.fcm.RetenoFirebaseMessagingService;

public class CustomMessagingService extends RetenoFirebaseMessagingService {
  @Override
  public void onCreate() {
    super.onCreate();
    // Your code here
  }

  @Override
  public void onNewToken(@NonNull String token) {
    super.onNewToken(token);
    // Your code here
  }

  @Override
  public void onMessageReceived(@NonNull RemoteMessage message) {
    super.onMessageReceived(message);
    // Your code here
  }
}
Then add the above service in your AndroidManifest.xml (.../android/app/src/main/AndroidManifest.xml) inside the application tag:
<service android:name=".CustomMessagingService" android:exported="false">
    <intent-filter>
        <action android:name="com.google.firebase.MESSAGING_EVENT"/>
    </intent-filter>
</service>
So your AndroidManifest.xml will look something like this:
<manifest xmlns:android="http://schemas.android.com/apk/res/android"
  package="com.reteno.sample">

    <uses-permission android:name="android.permission.INTERNET" />
    <uses-permission android:name="android.permission.POST_NOTIFICATIONS" />

    <application
      android:name=".MainApplication"
      android:label="@string/app_name"
      android:icon="@mipmap/ic_launcher"
      android:roundIcon="@mipmap/ic_launcher_round"
      android:allowBackup="false"
      android:networkSecurityConfig="@xml/network_security_config"
      android:theme="@style/AppTheme">
      <service android:name=".CustomMessagingService" android:exported="false">
        <intent-filter>
          <action android:name="com.google.firebase.MESSAGING_EVENT"/>
        </intent-filter>
      </service>
      <activity
        android:name=".MainActivity"
        android:label="@string/app_name"
        android:configChanges="keyboard|keyboardHidden|orientation|screenLayout|screenSize|smallestScreenSize|uiMode"
        android:launchMode="singleTask"
        android:windowSoftInputMode="adjustPan"
        android:exported="true">
        <intent-filter>
            <action android:name="android.intent.action.MAIN" />
            <category android:name="android.intent.category.LAUNCHER" />
        </intent-filter>
      </activity>
    </application>
</manifest>
Reteno does not require cleartext traffic, so the example does not set
android:usesCleartextTraffic="true". If your app needs HTTP access for local development, allow only the required hosts through a debug-specific Network Security Configuration instead of enabling cleartext traffic globally.
Optional. You may add your default icon and color for all Reteno notifications via AndroidManifest.xml. @drawable/ic_notification is the icon to be displayed, and @color/red_dark is the color of the icon. The only thing is that since Android 12, Material You has appeared - the user can change the color scheme of the entire device as he wants. Therefore, the color of the icon may differ on the latest android devices.
<meta-data
            android:name="@string/notification_icon"
            android:resource="@drawable/ic_notification" />

<meta-data
            android:name="@string/notification_icon_color"
            android:resource="@color/red_dark" />
Troubleshooting
Dependency ':app' requires core library desugaring to be enabled
Dependency ':app' requires core library desugaring to be enabled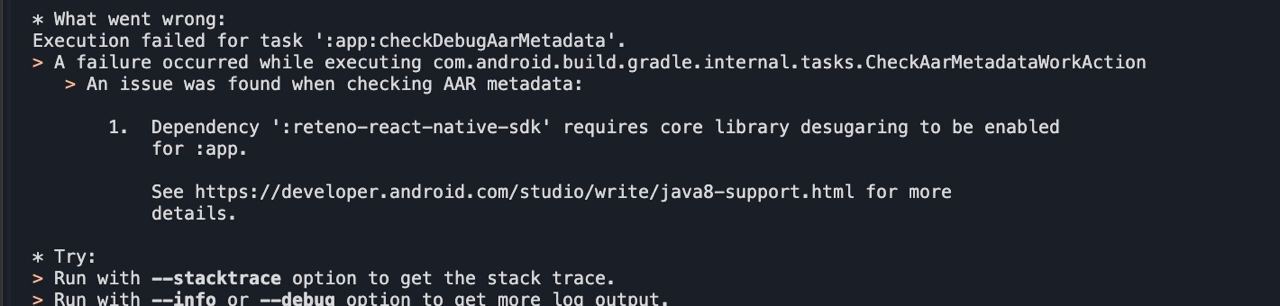
Core library desugaring is not enabled. See Step 3.
Native build failure matching the error below
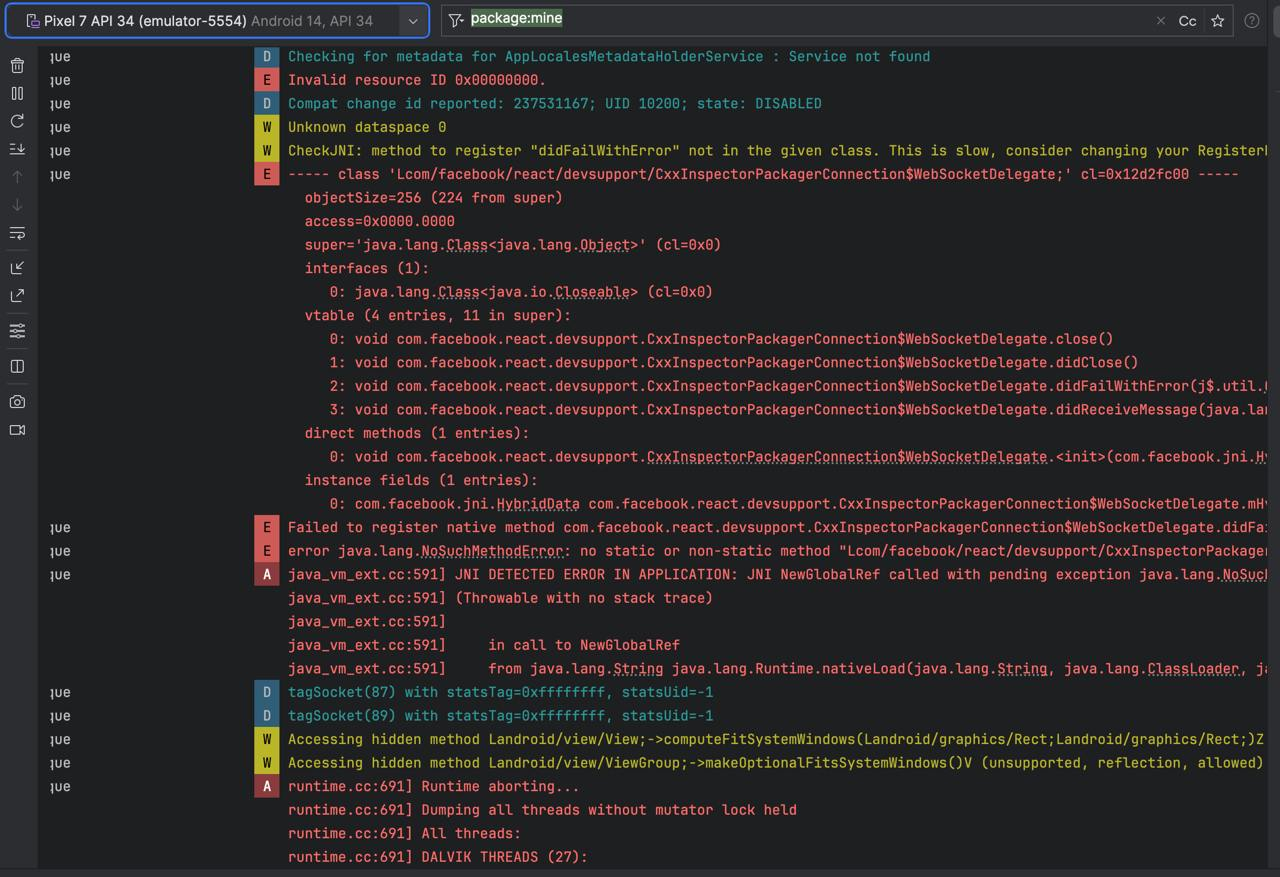
If your build fails with this specific error, update React Native to 0.75.4 or higher.
Other failures in the cxx / CMake stage are usually unrelated to Reteno — check your NDK and CMake versions, the configured ABIs, New Architecture settings, and any custom native code in the project before changing the React Native version.