
Setting Up Email Domain Authentication
This article explains how to authenticate your email sending domain in Yespo using SPF and DKIM DNS records. Domain authentication helps mailbox providers verify that Yespo is allowed to send emails on behalf of your domain and reduces the risk of sender forgery.
You will learn how to choose one of the available configuration methods — Full, Full +, or Subdomain — add the required DNS records, configure forwarding when needed, and verify the domain status in Yespo.
Before You Start
Make sure you have:
-
Access to the DNS settings of the domain or subdomain you want to authenticate.
-
A domain or subdomain that will be used in the sender address.
-
Access to mailbox or forwarding settings if you use the Full method and need to configure forwarding for
bounce+*addresses. -
Enough time for DNS changes to propagate. DNS changes can take up to 48 hours to propagate.
-
Read FAQ: Email Authentication and Domain Reputation to learn what SPF, DKIM, DMARC, and domain alignment are.
-
To deliver email to Apple private relay addresses, you must register your domains with Apple. See Delivering Email to Apple Private Relay Addresses.
How Email Domain Authentication Works
Yespo uses two main mechanisms to authenticate your sending domain:
- SPF checks whether an email was sent from a server authorized in your domain's DNS records.
- DKIM lets Yespo sign emails with a private key. Recipient mail servers verify the signature using a public key stored in your domain's DNS records.
Together, SPF and DKIM help mailbox providers trust your messages and reduce the chance that legitimate emails are flagged as spam.
Yespo provides the SPF and DKIM values required for domain authentication. Add them to your DNS using the record types and values shown in Yespo.
NoteDMARC is managed in your own DNS because it defines your domain's authentication policy. To learn what DMARC does, see FAQ: Email Authentication and Domain Reputation. For how a strict DMARC policy affects domain warm-up, see Domain Warm-up.
Root Domain, Sending Subdomain, and Technical Subdomain
Before choosing a configuration method, decide which domain will be used in your sender address.
You can authenticate:
- A root domain, for example
yourdomain.com, if your sender addresses use the main domain, such as[email protected]. - A sending subdomain, for example
promo.yourdomain.com, if your sender addresses use a dedicated subdomain, such as[email protected].
The domain in the sender address must match the verified domain or subdomain. Verifying yourdomain.com does not automatically verify promo.yourdomain.com.
Some configuration methods also use a technical subdomain. This subdomain is used for technical email processing and is not necessarily the same as the sender domain shown in the visible From address.
NoteIf you have several verified sending domains, you can use a different one for each email inside the same workflow — the domain is chosen per message, based on the sender you select in the email editor.
You can use the same sending domain in several accounts — for example, a production and a development account. In this case, the domain authentication configuration, including the technical subdomain, must be identical in all accounts. If the configuration differs, adding a sender with this domain in another account fails.
With the Full+ and Subdomain methods, the MX record of the technical or sending subdomain points to trap.esputnik.com, so mail addressed to a sender address on that subdomain reaches the platform rather than your mailbox. Collect replies at a reply-to address on a domain where you receive mail.
Set Up a Configuration Method
Yespo supports three domain configuration methods.
| Method | Use When | What It Covers |
|---|---|---|
| Full | You want to authenticate emails sent from addresses on the main domain, for example, [email protected]. | Emails sent from addresses on the main domain. Requires forwarding for bounce+* addresses. |
| Full + | You want to authenticate the main domain and selected subdomains. | Emails sent from the main domain and selected subdomains. |
| Subdomain | You want to send campaigns from a dedicated subdomain or separate marketing email reputation from other email streams. | Emails sent from a specific subdomain, for example @promo.yourdomain.com. Yespo handles spam complaints and errors for the selected subdomain. |
We recommend using Full + when possible. If this method is not available because of DNS, mailbox, or infrastructure restrictions, use Subdomain.
Method 1: Full
Use the Full method to authenticate emails sent from addresses on the main domain, for example, [email protected].
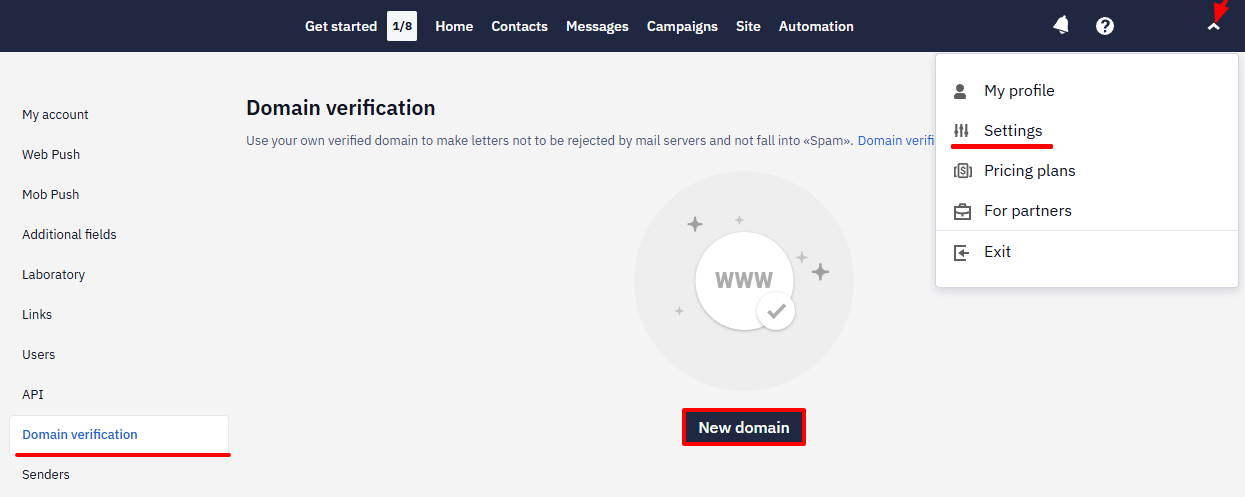
- Go to Settings → Domain verification and click New domain.
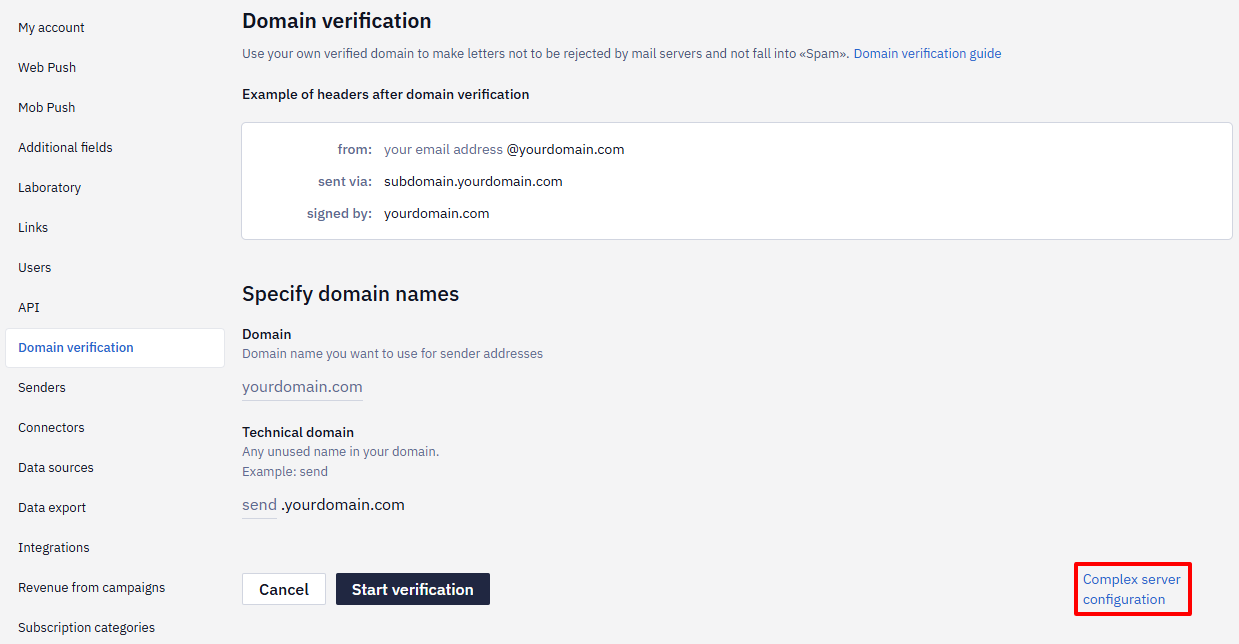
- Click Complex server configuration.
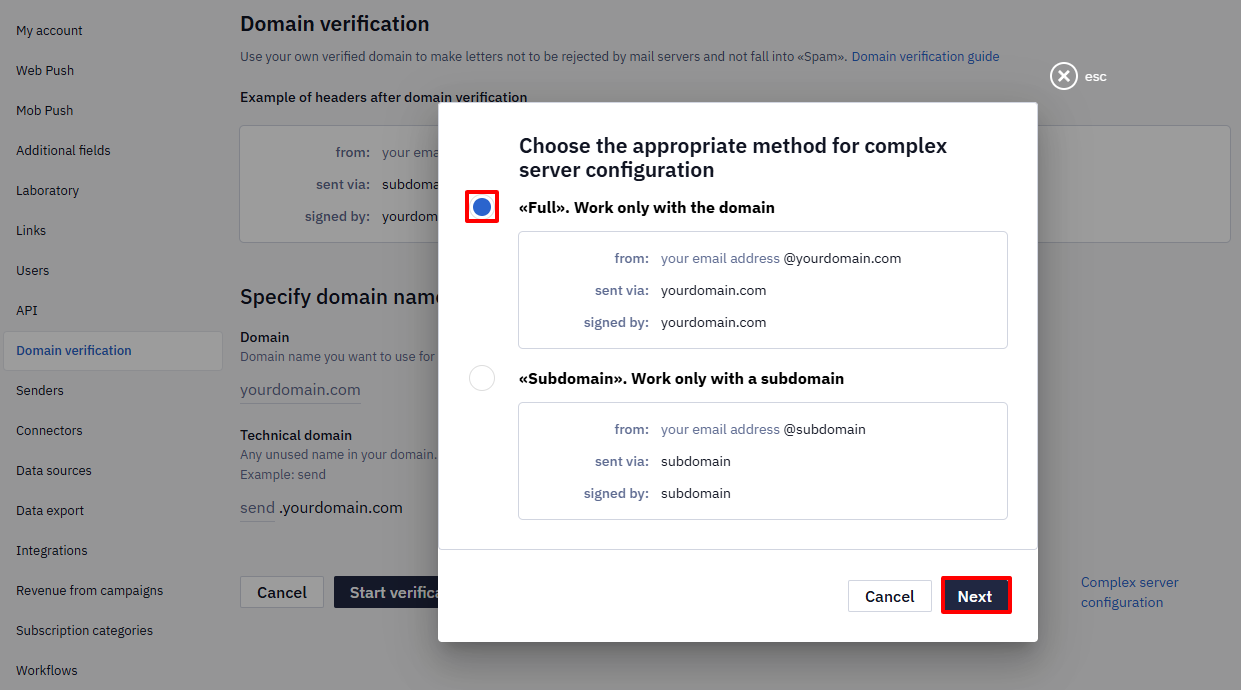
The Full configuration method is selected by default.
- Click Next.
- Enter your domain and click Start verification.
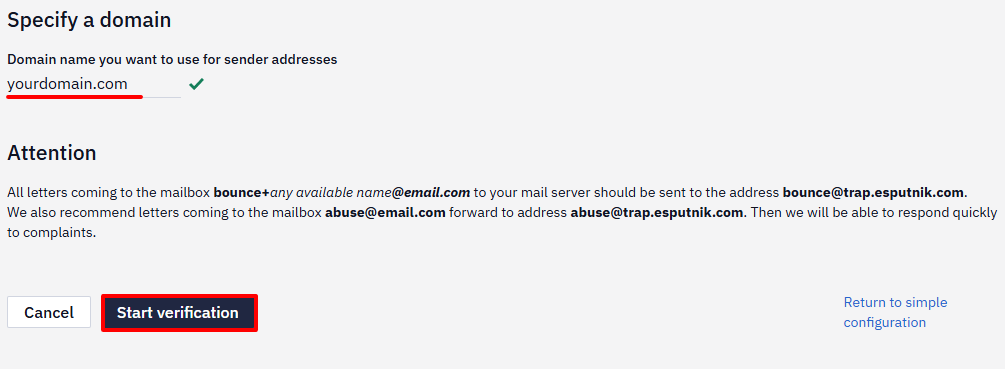
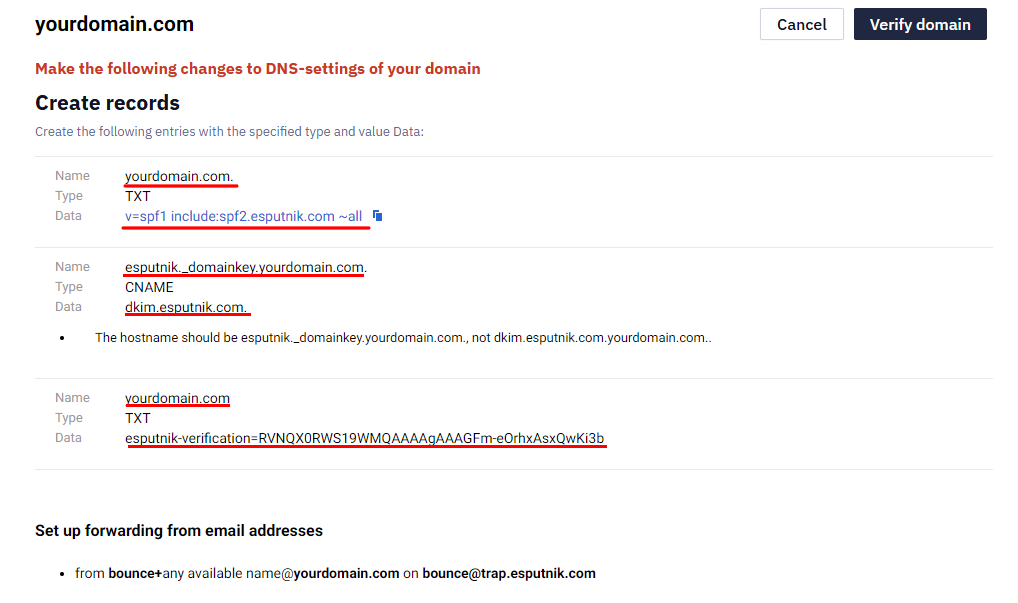
Yespo checks your domain's DNS records and shows which records need to be created or updated.
- Copy the values from the Name and Data fields and create DNS records of the corresponding types in your domain's DNS settings.
- Set up automatic forwarding for all emails sent to
bounce+*addresses on your domain to[email protected].
In bounce+*, the asterisk matches any sequence of valid characters after bounce+.
If your mail provider supports plus addressing, create a bounce mailbox and forward all incoming emails to [email protected].
If your mail provider does not support plus addressing, set up a mailbox that receives messages sent to non-existent addresses. In this mailbox, create a filter:
- If an email is sent to an address starting with
bounce+, forward it to[email protected]. - If an email is sent to any other non-existent mailbox, delete it.
Yespo checks whether forwarding works during domain verification.
NoteWe also recommend forwarding copies of emails sent to the
abuseaddress on your domain to[email protected]. This helps us respond to complaints promptly.
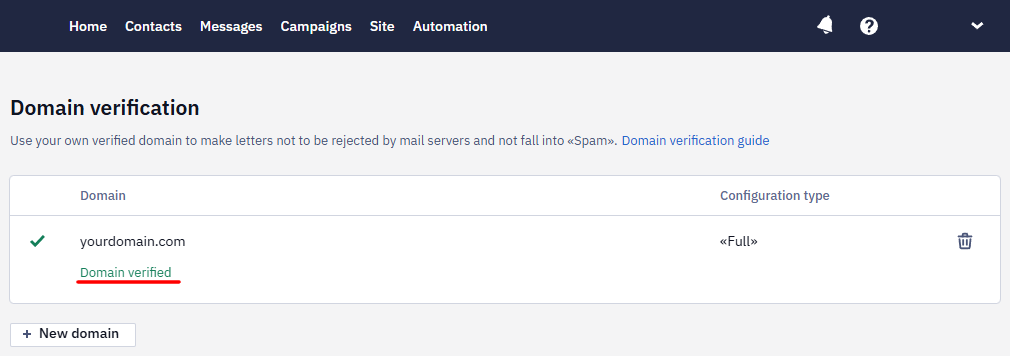
- Return to Yespo and click Verify domain.

After successful verification, the domain status changes to Domain verified.
Example of email headers in Gmail after domain verification:
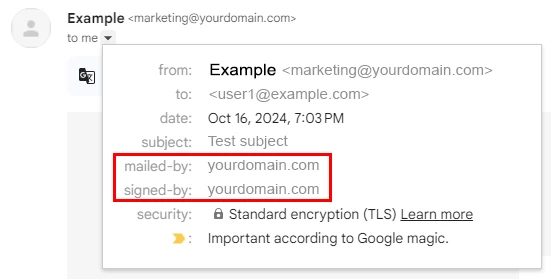
The email has two DKIM signatures: one for the Yespo domain and one for your domain.
Method 2: Full +
Use the Full + method to authenticate emails sent from the main domain and selected subdomains. We recommend this method when it is available.
- Go to Settings → Domain verification and click New domain.
- Enter the domain name.
- Enter an unused name for the technical subdomain. For example, use
email,promo,support, or another name. In the example below,subis used. - Click Start verification.
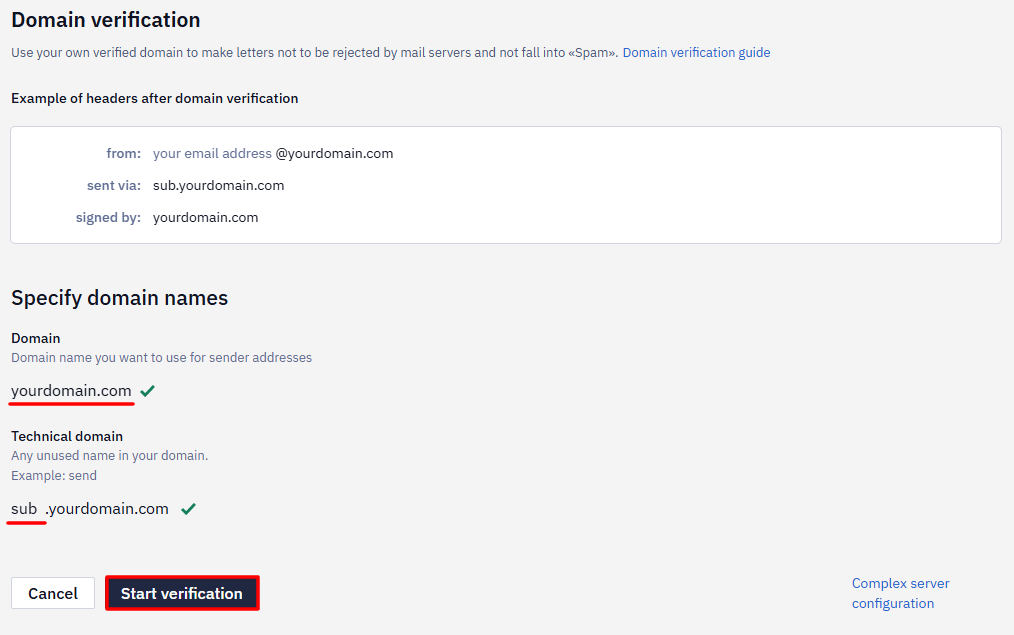
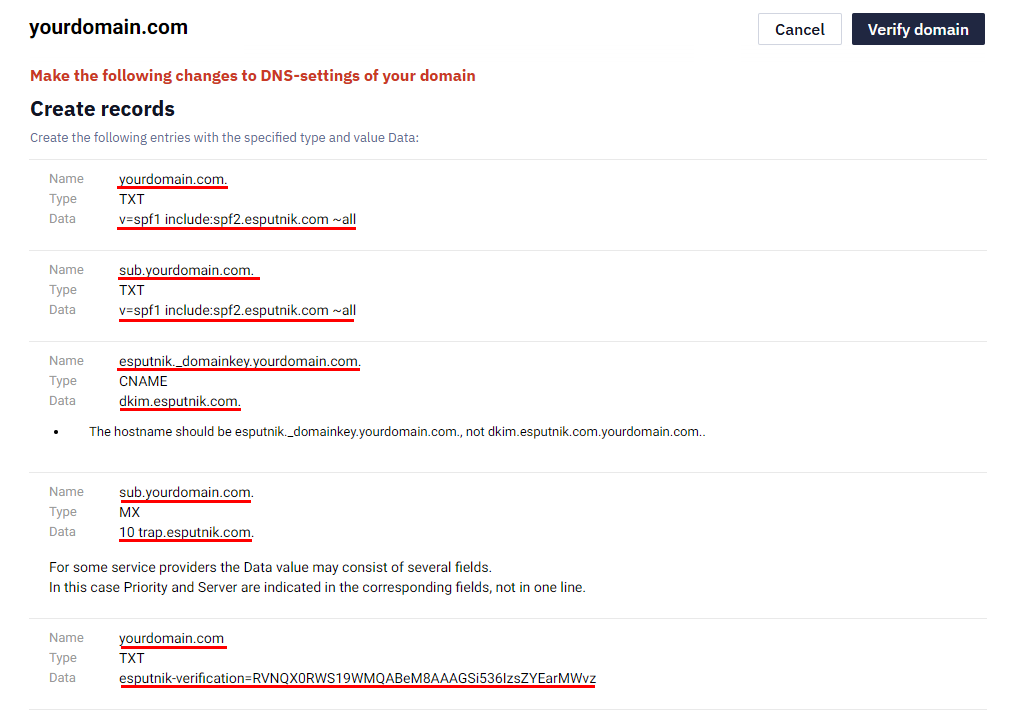
Yespo checks your domain's DNS records and shows which records need to be created or updated.
- Copy the values from the Name and Data fields and create DNS records of the corresponding types in your domain's DNS settings.
- Return to Yespo and click Verify domain.
After successful verification, the domain status changes to Domain verified.
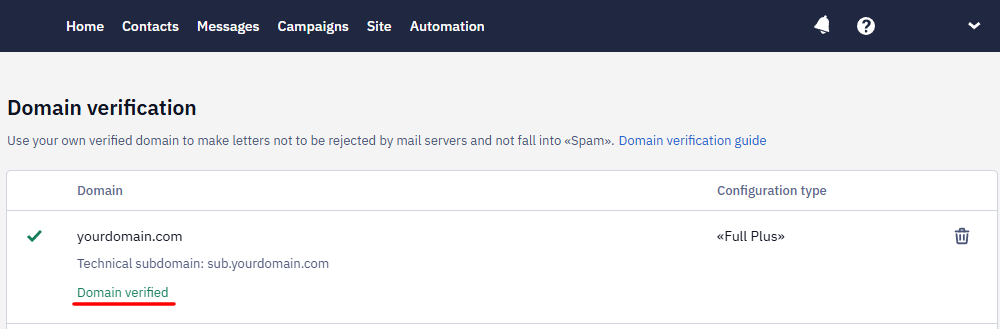
Example of email headers in Gmail after domain verification:
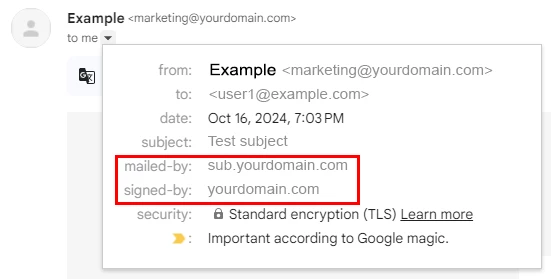
The email has two DKIM signatures: one for the Yespo domain and one for your domain.
Method 3: Subdomain
Use the Subdomain method to authenticate emails sent from a dedicated sending subdomain, for example @promo.yourdomain.com.
This method is useful when you want to keep marketing email reputation separate from the reputation of transactional and other email streams. With this method, spam complaints and errors are handled automatically for the selected subdomain.
- Go to Settings → Domain verification and click New domain.
- Click Complex server configuration.
- Select Subdomain and click Next.
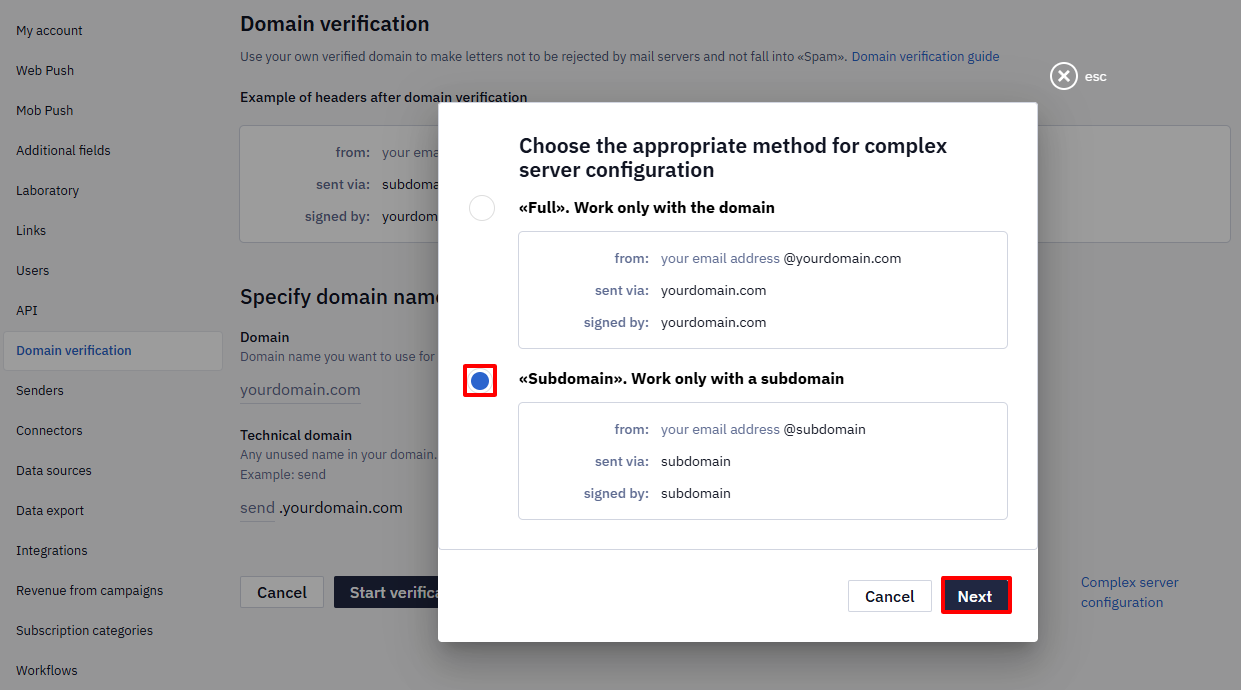
- Enter the subdomain and click Start configuration.
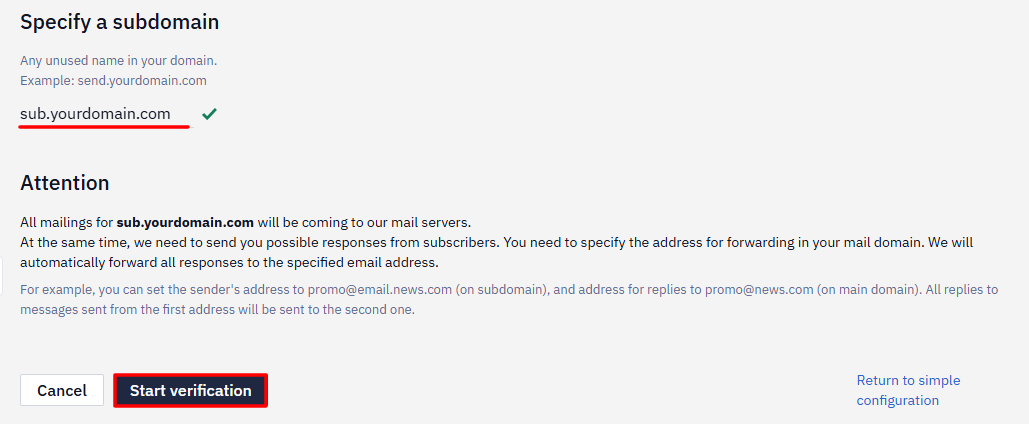
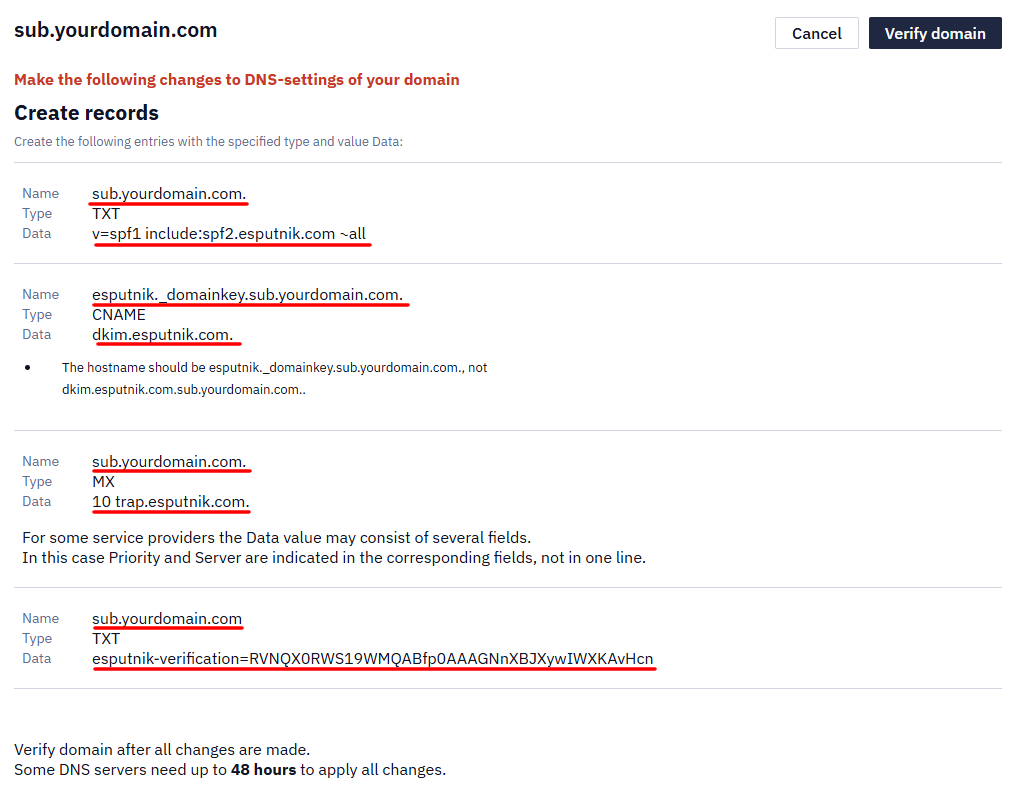
Yespo checks your subdomain's DNS records and shows which records need to be created or updated.
- Copy the values from the Name and Data fields and create DNS records of the corresponding types in your subdomain's DNS settings.
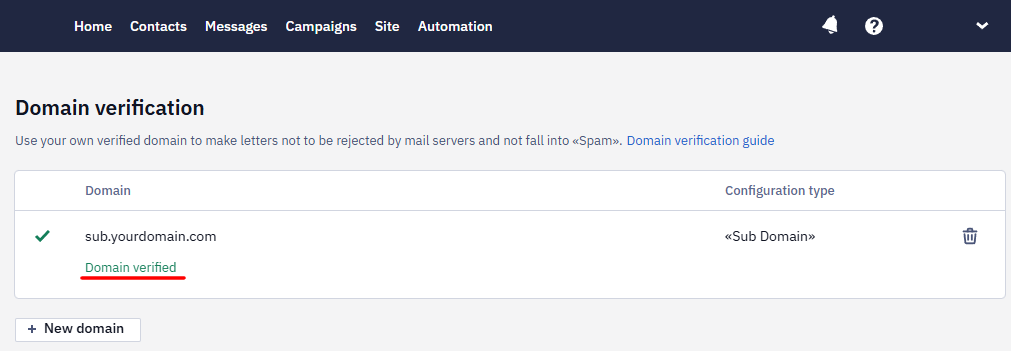
- Return to Yespo and click Verify domain.

After successful verification, the domain status changes to Domain verified.
Example of email headers in Gmail after domain verification:
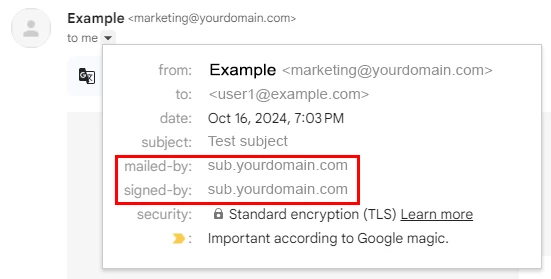
The email has two DKIM signatures: one for the Yespo domain and one for your subdomain.
Note
- With the Subdomain method, all mail for the selected subdomain arrives at Yespo mail servers and is forwarded to the address specified in the Reply field.
- The reply address must be valid, and the corresponding mailbox must be monitored.
- Recipients can reply to your emails or send unsubscribe requests. Process such requests promptly.
You can also follow the dedicated guide to set up email domain authentication on Cloudflare.
Verify Domain Settings
After you add or update the required DNS records, return to Settings → Domain verification in Yespo and click Verify domain.
If the setup is correct, the domain status changes to Domain verified.
If Yespo detects issues with the DNS records, a warning appears next to the verification status.
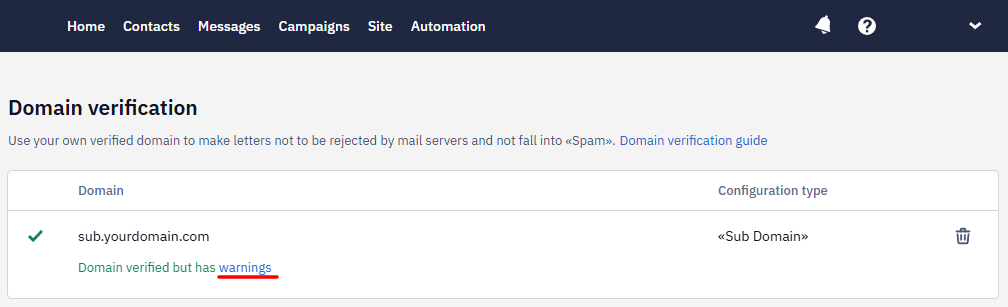
Click the warning to view the recommended changes.
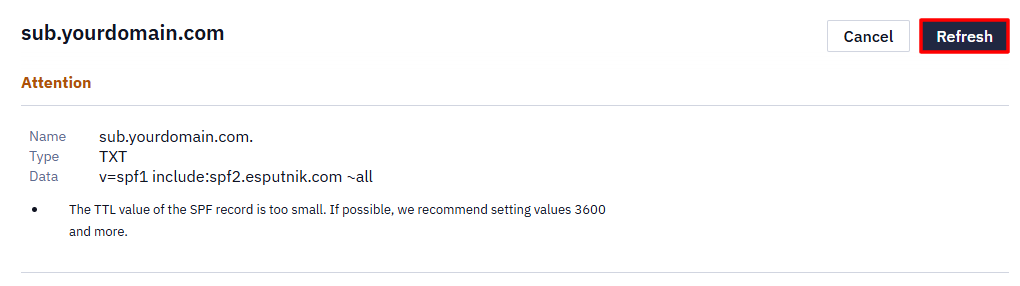
Make the recommended changes in your DNS settings, and then click Refresh in Yespo.
You can also use external DNS tools to check whether your records are available to mail servers:
- Use DNS Record Query to check published DNS records.
- Use SPF Policy Tester to check whether your SPF record is valid and stays within SPF limitations.
Expected Result
After successful verification:
- The domain or subdomain status changes to Domain verified.
- Yespo can sign emails with DKIM for your domain or subdomain.
- You can use sender addresses that match the verified domain or subdomain.
- Test emails should pass SPF and DKIM checks.
- The domain in the visible From address should match the verified sending domain.
Before You Launch: Preflight Checklist
Before you start sending, confirm:
- Your domain or subdomain shows Domain verified in Settings → Domain verification, with no outstanding warnings.
- DNS changes have fully propagated. Allow up to 48 hours and re-check with a DNS tool if needed.
- Your sender address uses the verified domain or subdomain. See Adding a Sender.
- Your reply-to address is valid, and the corresponding mailbox is monitored.
- You have sent a test email and confirmed that it passes SPF and DKIM checks, for example, with Mail-Tester.
Additional DNS Settings
If necessary, you can grant Yespo access to Google Postmaster Tools analytics. To do this, add the TXT or CNAME record provided by Yespo to your DNS settings.
Read Google's documentation to learn more about Google Postmaster Tools DNS verification.
Links in your emails are wrapped in a shared short-link domain — which one depends on the account, see Dynamic Links in Email. Setting up a domain of your own for them is separate from sender domain authentication and is done in the account settings — see Setting Up a Custom Domain for URL Shortening.
MX Record Requirements
Verification checks that the domain can receive mail, so it requires an MX record.
The Domain Has No Mail Hosting
If no mail service is connected to the domain, the domain has no MX record at all — there is nothing to copy into the DNS and nothing for the check to find. Connect a mail service first:
- Set up a mailbox for the domain with a mail provider — for example, Google Workspace, Microsoft 365, or Amazon WorkMail.
- Add the MX record supplied by that provider to your DNS.
- Wait for the record to propagate, then return to Yespo and run verification again.
There is no way to verify a domain that receives no mail. If verification still fails after the MX record is published, see Domain Verification Troubleshooting.
A CNAME Already Exists on the Subdomain
If the subdomain you selected already has a CNAME record, you can't add MX or TXT records to it. The DNS standard does not allow a CNAME to coexist with any other record on the same name, so the DNS provider either rejects the new record or the added record is ignored.
Use a different subdomain that is not yet in use for the authentication setup — for example, promo.yourdomain.com or news.yourdomain.com — and add the full record set there.
Troubleshooting
If verification fails because of a missing MX record, an invalid or duplicate SPF record, a missing DKIM record, an incorrect Name or Host value, or another DNS issue, see Domain Verification Troubleshooting.
If your domain shows as verified and DKIM is passing, but recipients (for example Gmail) still mark mail as failing DMARC or send it to spam, this is usually a domain alignment issue rather than a configuration error — the From domain doesn't align with the domain authenticated by SPF/DKIM. DMARC requires the From domain to match (or be a subdomain of) the domain that SPF or DKIM authenticated; passing SPF/DKIM alone for a different domain doesn't satisfy DMARC.
How Yespo Monitors Domain Settings
Yespo regularly checks whether your DNS settings remain valid.
If the settings no longer meet the requirements, we notify you by email. DKIM signing with your domain key is suspended until the issue is resolved. Read automated emails from Yespo carefully, and contact our support team if you need help.
Deleting a Domain
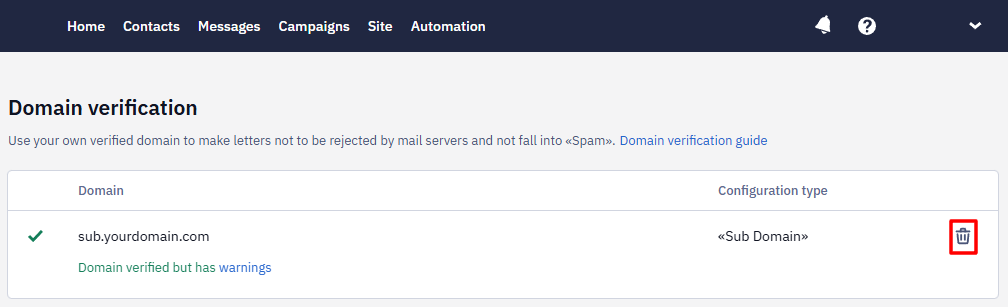
Click the trash can icon in the right column to delete a domain, then confirm the action.
Next Steps
- Warm up your domain before increasing send volume. See Domain Warm-up.
- Set up your senders and reply-to addresses. See Adding a Sender.
- Protect inbound mail to your domain with MTA-STS alongside a strict DMARC policy. See Setting Up MTA-STS and TLS-RPT.
- Add a custom domain for short links so that links in your emails point to your own domain. See Setting Up a Custom Domain for URL Shortening.
- Add a BIMI logo after domain authentication is stable. BIMI usually requires an enforced DMARC policy, such as
p=quarantineorp=reject. See Adding a BIMI Logo.
Updated 22 days ago