
Widget Calling Using JavaScript API
Use the JavaScript API to show a Yespo widget based on your own site logic. For example, you can open a widget after registration, adding a product to the cart, completing a purchase, or any other defined action.
The eS('showForm', ...) call shows the selected widget on a page where the Yespo web tracking script is installed. You can add it directly to your site code or run it via Google Tag Manager. To run your own code when a visitor submits the form, use the eS('onWidgetEvents', ...) call described below.
Note
- This call does not require an API key. The function runs in the browser via the Yespo script installed on your site.
- The API call does not check the configured calling rules: the widget appears immediately after the function runs, without checking the frequency, time on page, device type, or other conditions.
- The API call does not disable rule-based display. If the Rule-based mode is also enabled for the widget, it can appear both according to these rules and after the function runs. See Widget Calling for details.
Function for showing a widget
eS('showForm', {
  formVariantId: 'f(form id)v(variant id)'
});
Parameters
The function takes one required parameter:
| Parameter | Type | Required | Description |
|---|---|---|---|
formVariantId | string | Yes | The identifier of the widget and its variant in the f(form id)v(variant id) format, for example f12345v12345. The JavaScript API uses the technical term form for a widget. Copy the ready-made value from the settings of the widget you need. |
Where to Copy the Function
The ready-made function with your widget's identifier is displayed in the widget display settings:
-
Open the widget in the editor and go to the Parameters tab.
-
In the Widget calling block, find the Call with JavaScript API section.
-
Copy the function by clicking the copy icon.
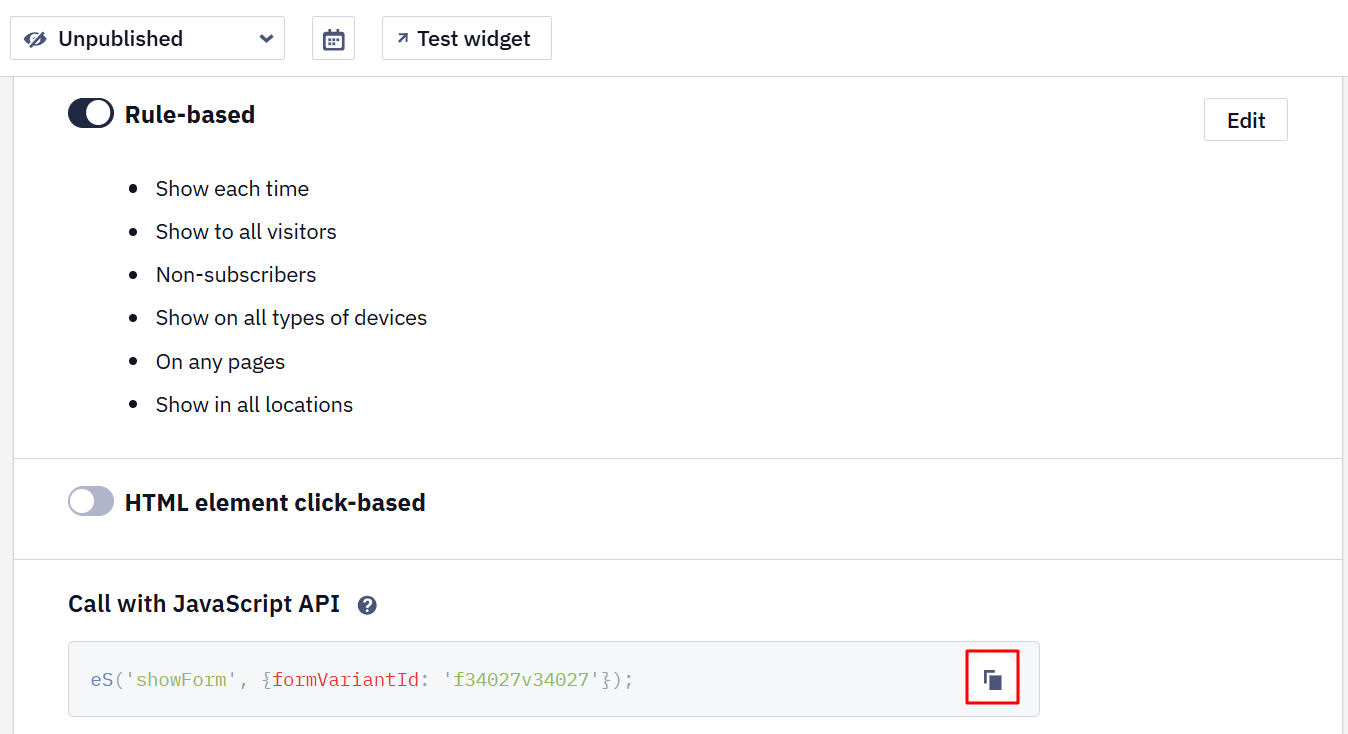
- Add the function to your site code where the API call should run, and publish the changes.
The function is available for any widget — you do not need to enable this calling method separately.
Example: showing a widget on a button click
For a simple click-triggered display, it is usually enough to configure the HTML element click-based calling mode described in Widget Calling. Use the JavaScript API when your own site logic determines the display moment.
<button id="show-discount-widget" type="button">
  Subscribe for discounts
</button>

<script>
  document
    .getElementById('show-discount-widget')
    .addEventListener('click', function () {
      eS('showForm', {
        formVariantId: 'f12345v12345'
      });
    });
</script>
In the example, replace f12345v12345 with your widget's value.
Calling via Google Tag Manager
-
Create a Custom HTML tag.
-
Add the copied function:
<script> eS('showForm', { formVariantId: 'f12345v12345' }); </script> -
Configure the trigger that determines when the tag fires.
-
Publish the container and check the widget display.
Tracking widget events
To run your own code when a visitor submits contact data in the widget — for example, to send the event to your analytics — subscribe to widget events:
eS('onWidgetEvents', {
  formVariantId: 'f12345v12345'
}, function (event) {
  if (event.type === 'CONTACT_DATA_SUBMIT') {
    // your code, for example sending the event to analytics
    console.log('The visitor submitted the form');
  }
});
The callback is registered for the widget specified in formVariantId and runs every time the event fires.
Parameters
| Parameter | Type | Required | Description |
|---|---|---|---|
formVariantId | string | Yes | The identifier of the widget whose events you want to track, in the same f(form id)v(variant id) format as for showForm. |
callback | function | Yes | The function that runs when the event fires. It receives an event object with the type field. |
Available events
| Event | When it fires |
|---|---|
CONTACT_DATA_SUBMIT | The visitor submitted contact data in the widget. |
NoteFor a multistep widget, where each position is a button and clicking it reveals the next step, GA event tracking cannot distinguish which specific button or step triggered the click. Any button click in the widget sends the same generic
FormButtonClickGA event, regardless of the step or button clicked.
Check the result
- Publish the widget.
- Open the site page where the function is added and perform the action that runs it.
- Make sure the widget appears. It is displayed immediately after the function runs.
If the widget is not displayed
The widget does not appear after the action
Possible cause: the Yespo script is missing on the page, blocked by the browser or an extension, or the widget is not published.
Solution: check that the script is installed on this exact page and domain and loads without blocking, and that the widget has the Published status.
The browser console shows the eS is not defined error
Possible cause: the function runs before the Yespo script loads and initializes, or the script is missing on the page.
Solution: make sure the Yespo script is installed on the page and the function runs after it loads and initializes. If you use Google Tag Manager, check that the tag with the function does not fire before the Yespo script loads.
The function runs, but a different widget appears or nothing happens
Possible cause: the function contains the formVariantId of a different widget.
Solution: copy the function from the settings of the exact widget that should be displayed.
Related articles
- Widget Calling
- Widget Calling Using JavaScript Variables
- Setting Up Widgets for Your Site
- Creating Pop-ups via Google Tag Manager or WordPress
Updated 2 months ago