
Actions Blocks
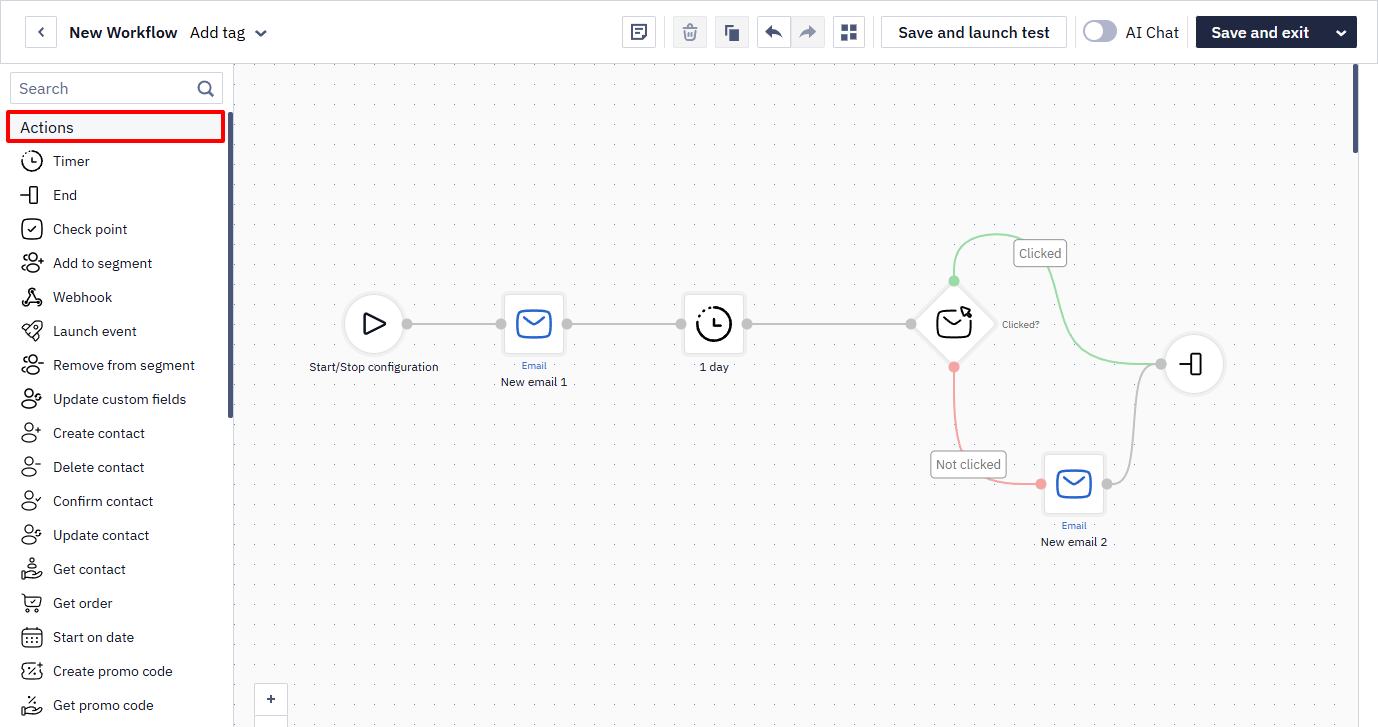
Actions blocks control workflow execution and checkpoints, manage contacts, work with promo codes and orders, and integrate workflows with external services. Each block performs a task and then passes control on to the next block.
Use Actions blocks to keep contact data fresh and workflows running on schedule — from delaying a message until the right moment to updating records, managing segments, or exchanging data with external systems as contacts move through the workflow.
Timer
The block is used to set a time gap before the next action or message sending. It is placed before a block you want to delay.
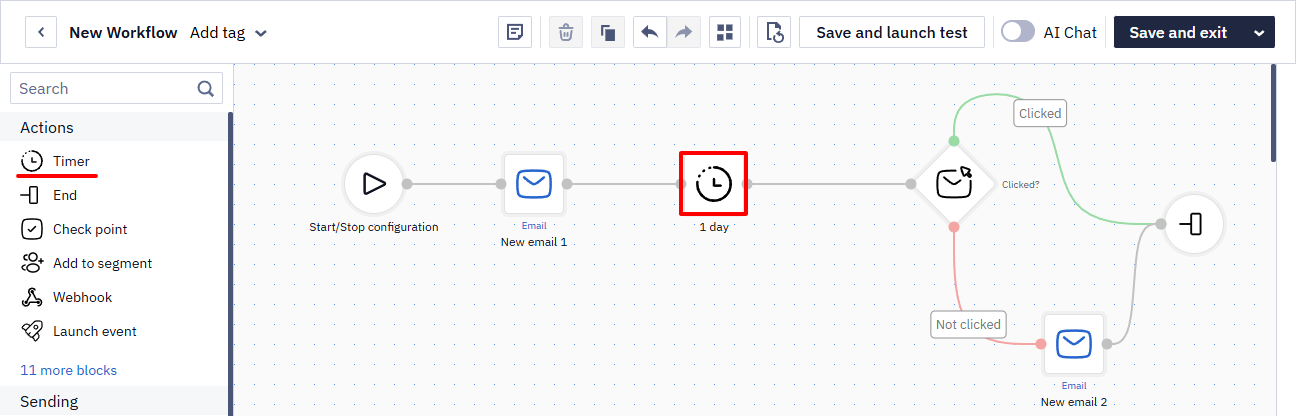
Contact confirmation triggers the workflow with a drip welcome series in the example. A new contact receives a welcome email after confirmation, a second email after two days, and a third after the next three days.
To set up Timer, configure one of 2 or both parameters:
- Wait time
- Wait until
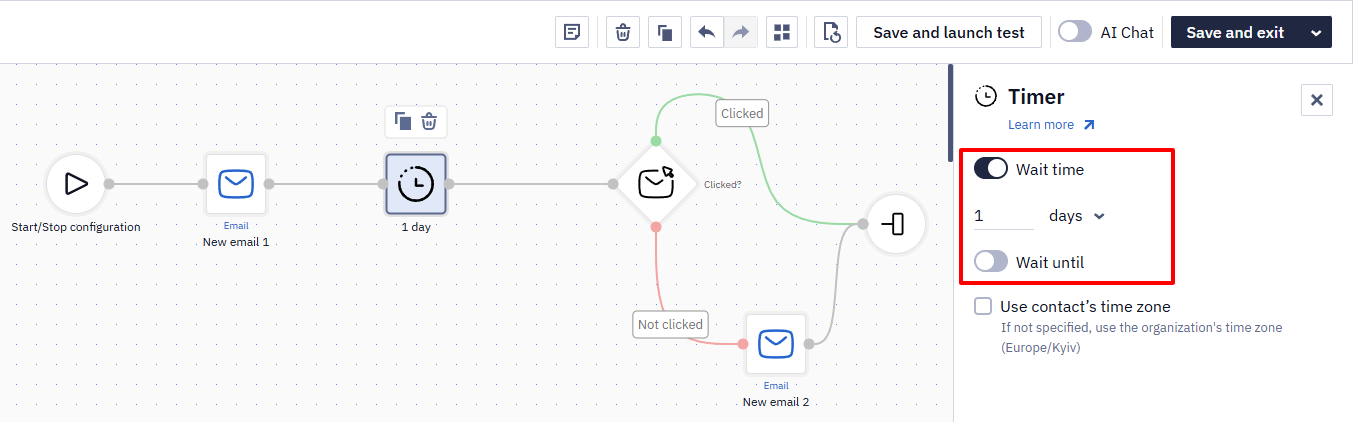
You can configure all parameters or only one; at least one parameter should be configured to start a workflow.
NoteIf a Timer stands before the sending blocks, editing the workflow's messages doesn't affect the contacts already waiting in it. The updated message starts going out only after the Timer's interval has passed since the change. For example, with a 38-hour Timer that means 38 hours of the previous version still being sent.
Wait Time
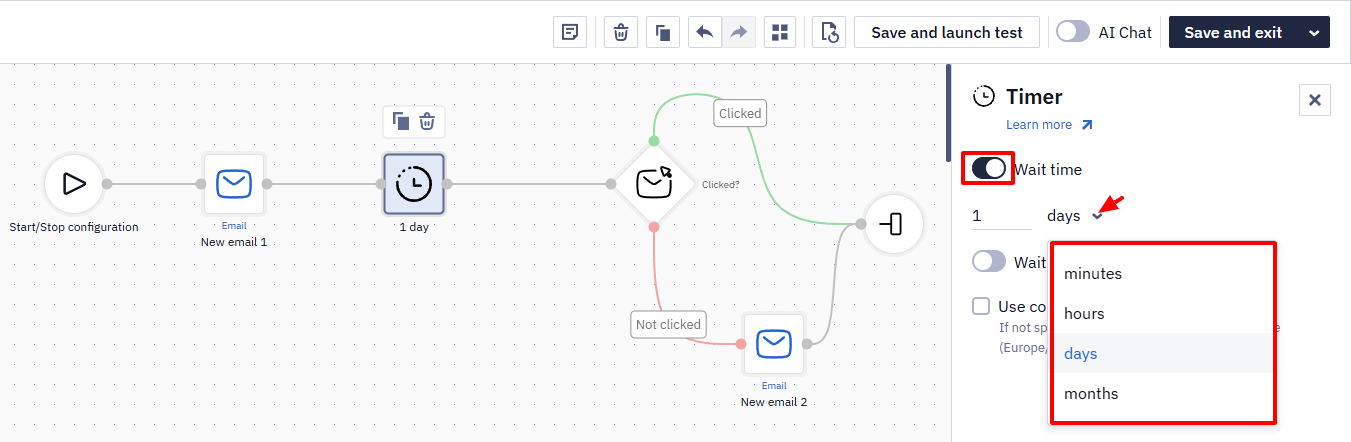
Enter the time of delay, and select the parameter to which it will be applied:
- minutes
- hours
- days
- months
The maximum wait time is 180 days, or 6 months if you set the delay in months.
If you delay for 1/2/3 days, the delayed action will start 24/48/72 hours after the workflow is triggered. If a person subscribes to you at 7 a.m., they will receive the first email at 7 a.m. the next day.
Wait Until
In the Wait until parameter, you can specify the time yourself, use data from an additional field of the contact card or from the context parameter (the event that launches the workflow).
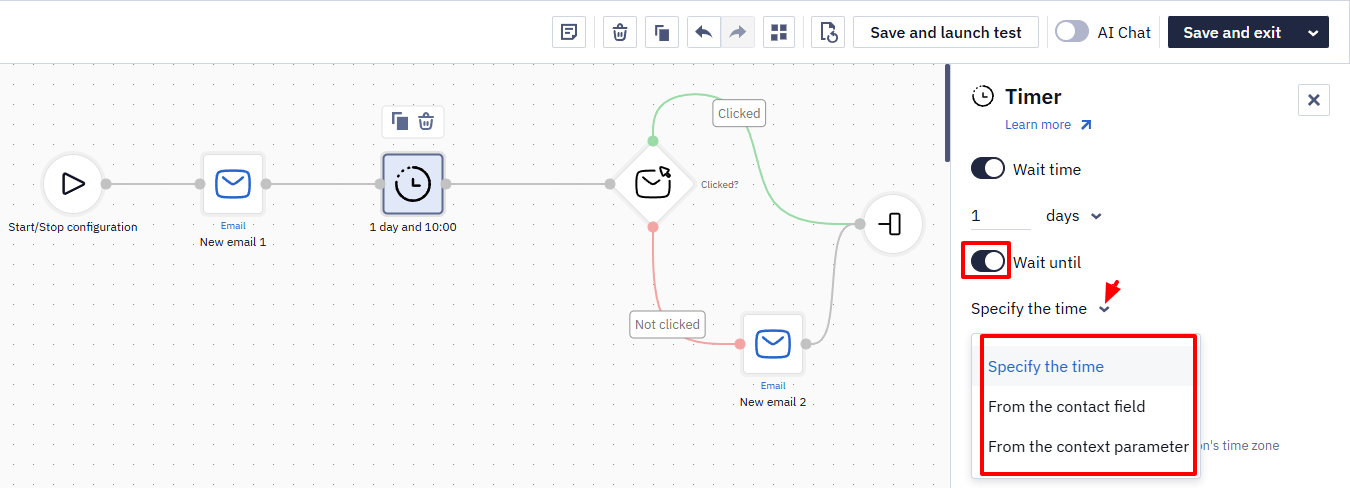
Specifying the Time Manually
Here you can select the day of the week and the time for sending.
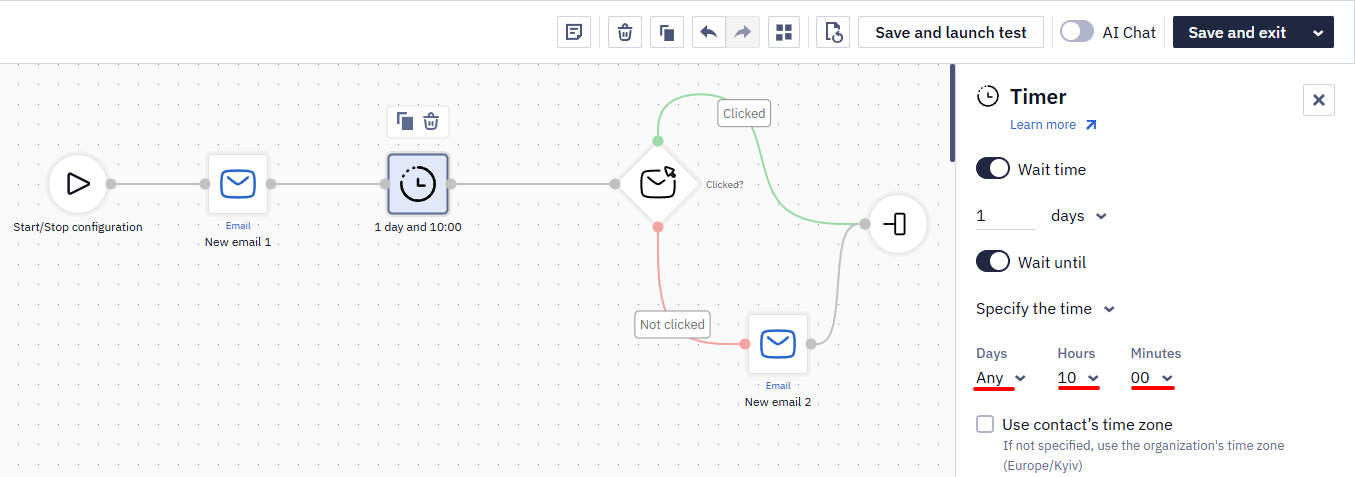
If you set the sending time at 8:45 a.m. and the workflow starts at 3:00 p.m., the subscriber will receive the message at 8:45 a.m. the next day.
If today is Tuesday and you've chosen to send a message on Monday, the message will be sent next Monday. If it's Monday today, the subscriber will receive the message today.
Using the Time from an Additional Contact Field
For example, you can use this option to set up reminders if you collect data in additional fields about the time your subscribers perform specific actions: make purchases, exercise, study, etc.
Select the contact field containing the time you want to wait.
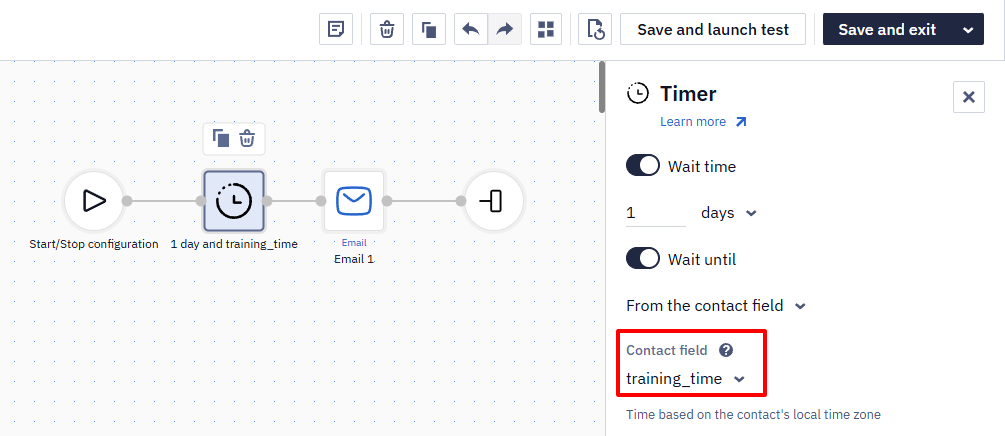
The time from the contact field is based on the contact's time zone and must be sent to the text field in the HH:MM or HH:MM:SS format. If the field of a contact participating in the workflow has a missing or written in an incorrect format value, the corresponding error will be displayed in the launch history of such a workflow.
Using the Time from a Context Parameter
You can use this option to set up reminders if the data about the time your subscribers perform specific actions is not tied to additional fields and you are focusing on actual data — for example, when the last event about the workout start was received.
Specify the event parameter containing the time to wait until.
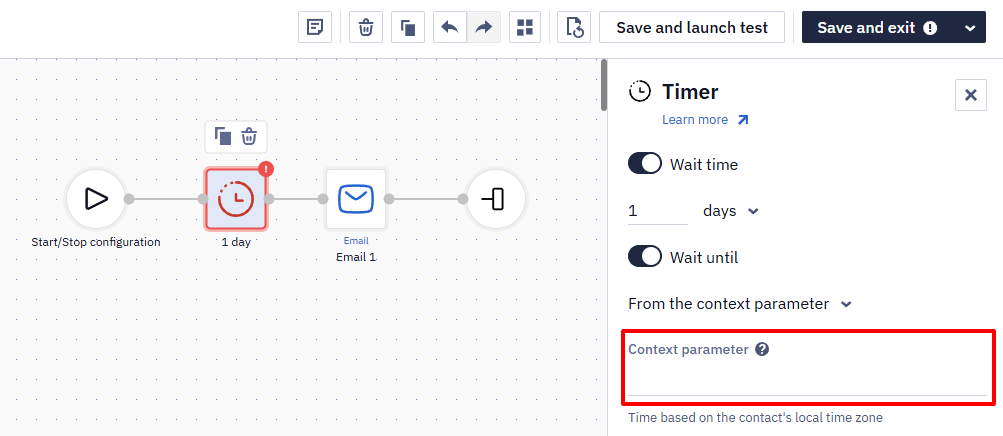
The time from the event parameter is based on the contact's time zone and must be sent to the text field in the ISO 8601 format. If the value is missing or written in an incorrect format in the event that launches the workflow, the corresponding error will be displayed in the workflow's launch history.
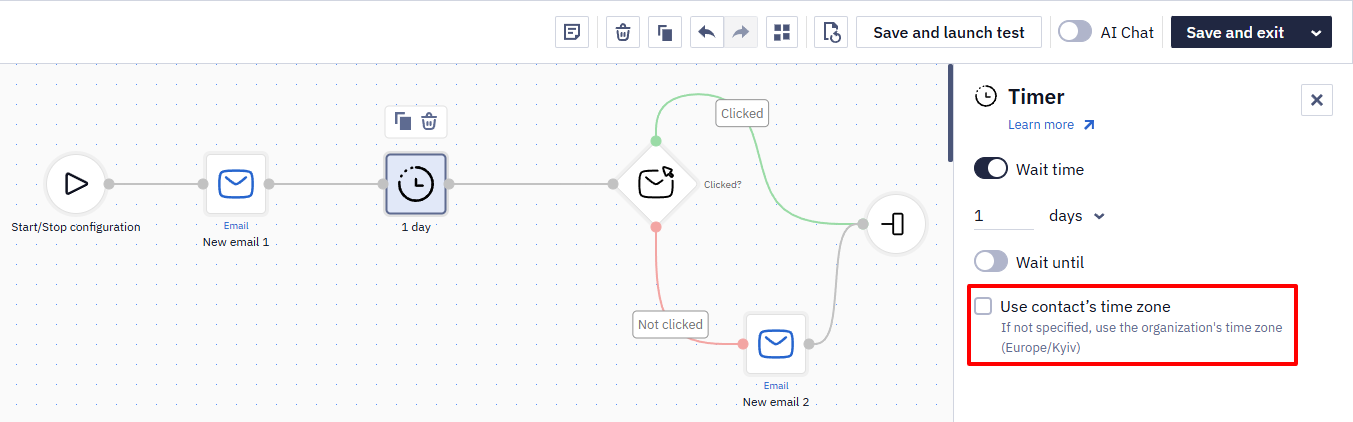
Use Contact's Time Zone Parameter
Activating this parameter will allow you to send a message at a specific time, taking into account the contact's time zone.
Parameter Priority
For example, you've configured the following delay parameters:
- wait day;
- send on Monday.
- send time at 8:45 a.m.
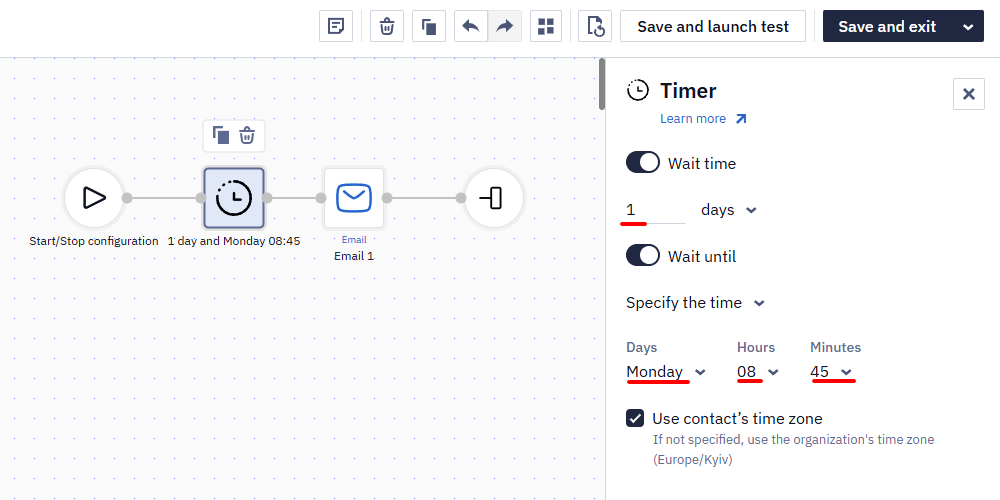
The workflow starts on Sunday at 3 p.m. The system waits for 1 day (24 hours). Then it's Monday. The Wait 1 day parameter expires at 3 p.m. on Monday. The system checks the Send parameter. You have chosen Monday, today is Monday, so far everything is fine.
The system checks Send time. It's set for 8:45 a.m., and the workflow is triggered at 3 p.m. The subscriber will receive the message not this Monday but only the next one at 8:45 a.m.
End
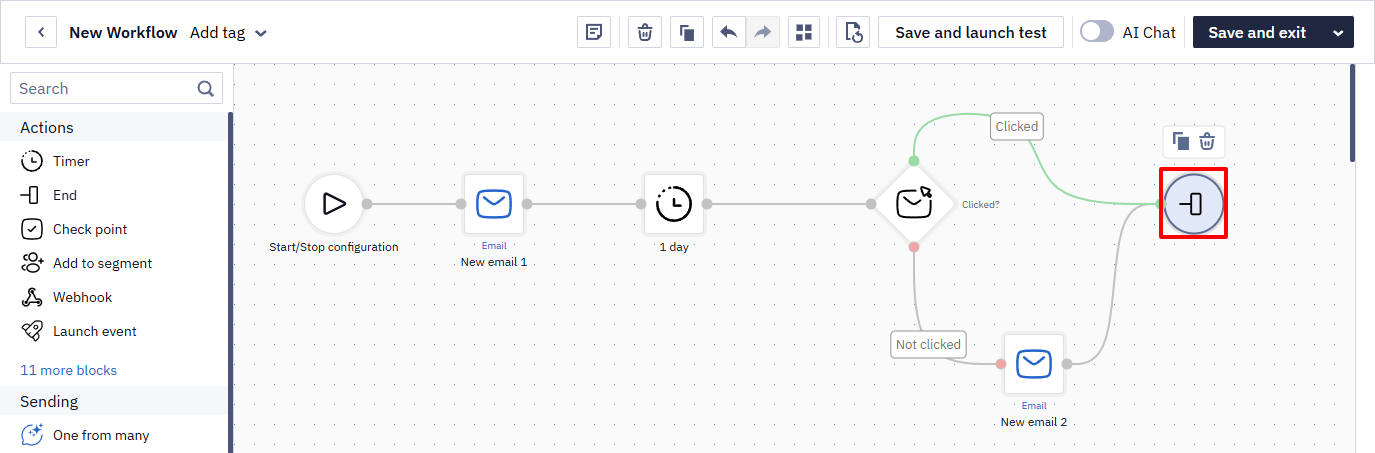
We recommend using the End block at the end of the workflow and all its paths. Adding this block will help visually understand the logic of the workflow and actions before the end. This is especially useful when the workflow has a path structure and a significant number of other blocks.
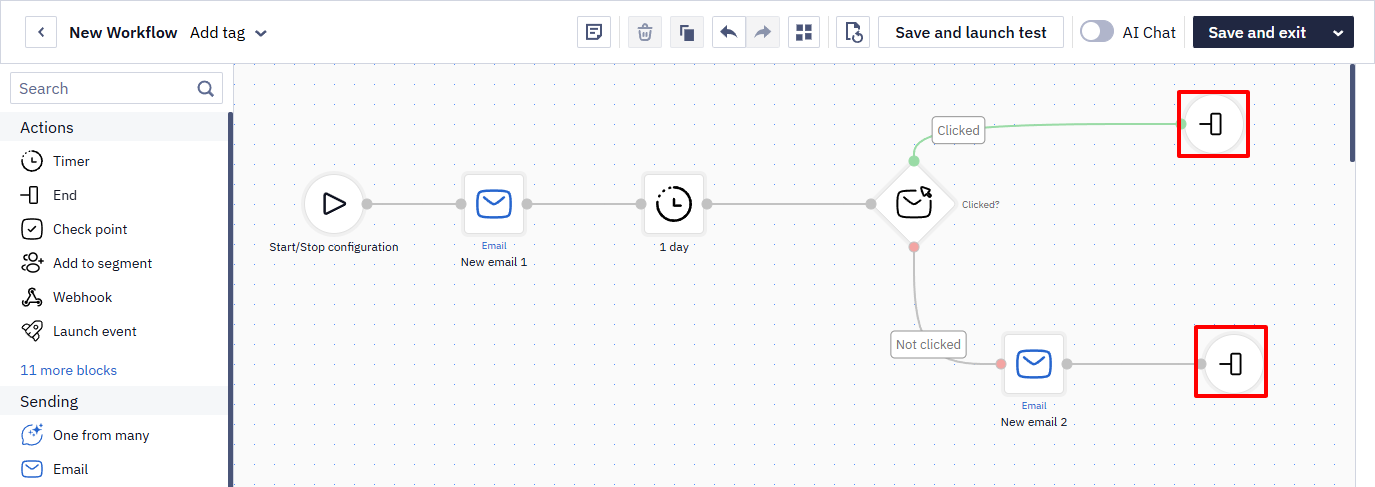
You can also connect multiple branches to a single End block to simplify the workflow structure.
Check Point
If you have a complex workflow with paths, you can add this block at any point and then check in the workflow launch history if it followed a specific path. A Check point can also bridge multiple paths. Not all blocks allow connection to several paths, but this block solves that task.
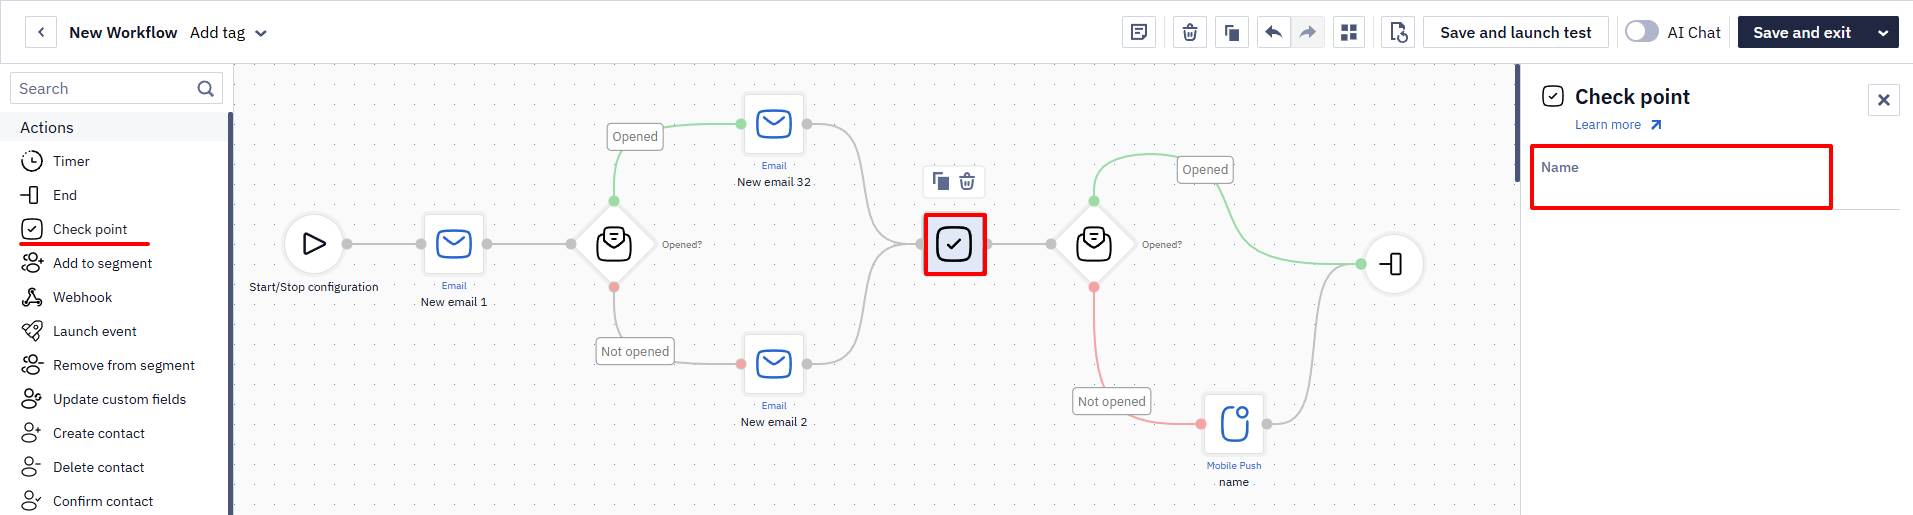
The block has one parameter: Name.
Add to Segment
Adds the contact to the segment selected in the Segment parameter.
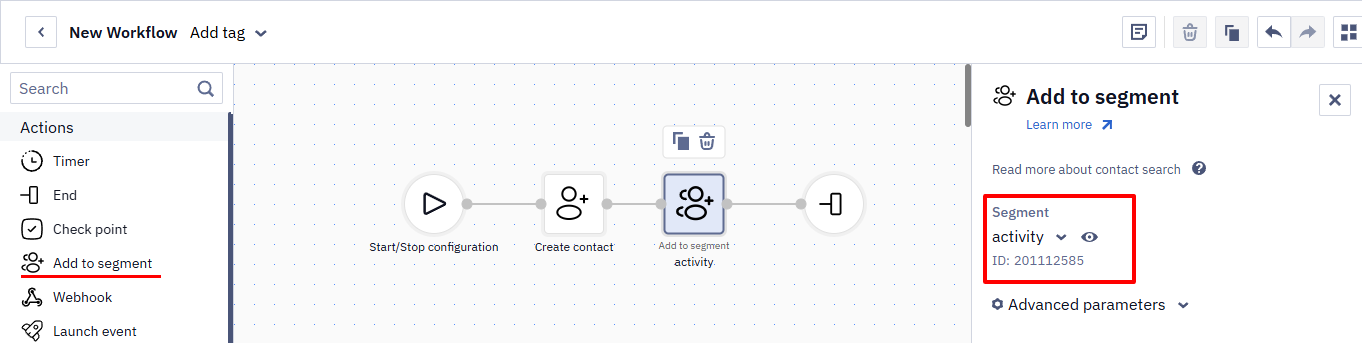
The block has one basic parameter:
| Parameter | Configuration |
|---|---|
| Segment | Select the segment to which the contact will be added. |
You can add a contact only to a list segment. In the Segment selector, you can also create a List segment without leaving the workflow editor.
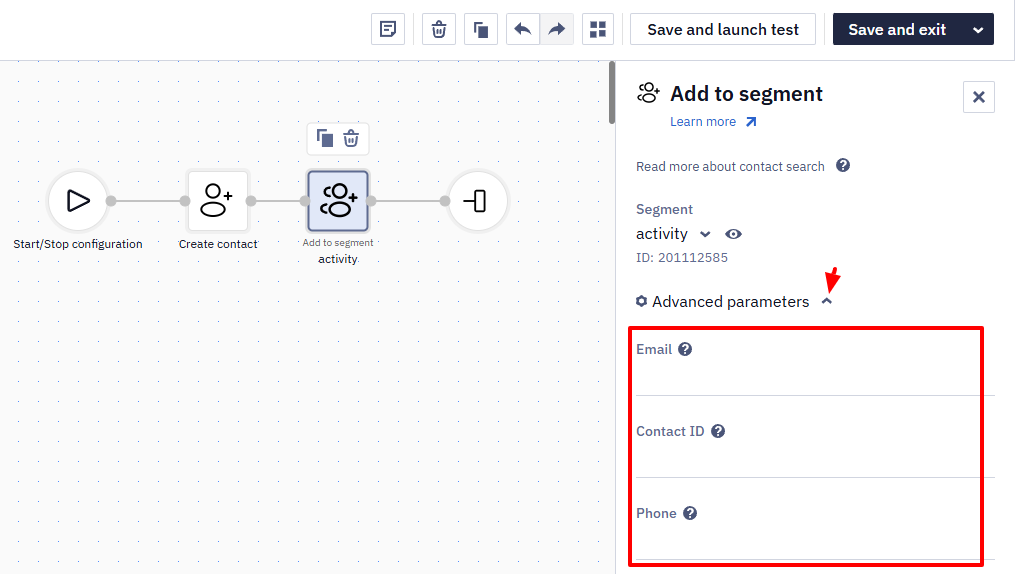
The block also contains advanced parameters. Read about the use cases for advanced parameters in a separate article.
Webhook
The task of this block is to request the specified URL (use only the HTTPS protocol). Available request types are GET and POST. Data format: JSON, XML, text.
Use webhooks, when you need to access the data source by reference to return a promo code or authorization token, and then display this data in a message within a workflow. With this block, you can also transmit to the specified address:
- parameters from the event that launched the workflow,
- (additional) fields of the contact on which the workflow launched.
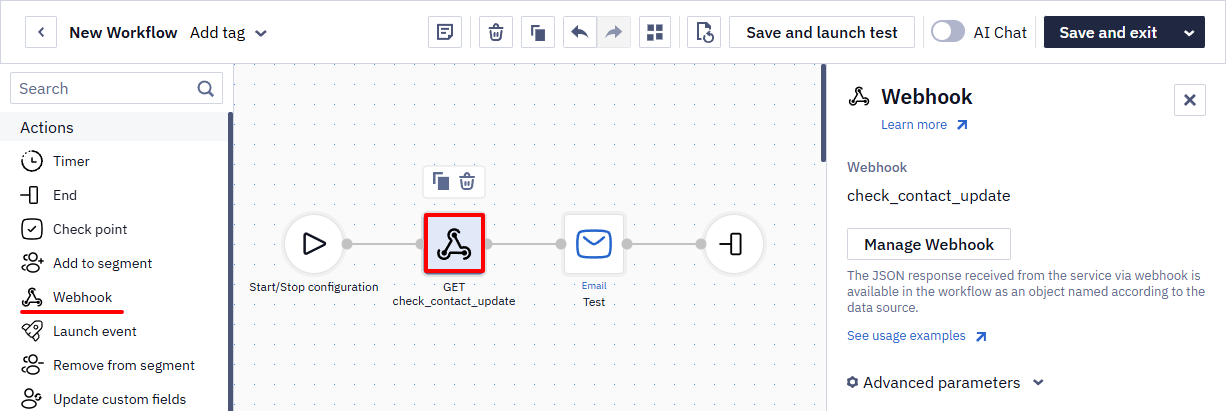
The Webhook block is used only in combination with the block for sending a single message in any channel, and also with the Variable matches regular expression block from the Conditions group.
Read the full, detailed instructions on setting up, testing, and managing webhooks — including data substitution formats, header/authentication options, and worked GET/POST examples — in the dedicated Webhooks in Workflows article.
Launch Event
The purpose of this block is to trigger another event from a workflow. For example, one workflow can launch another.
Select the event you plan to launch in the Event field, or create it right here: click New event at the top of the list.
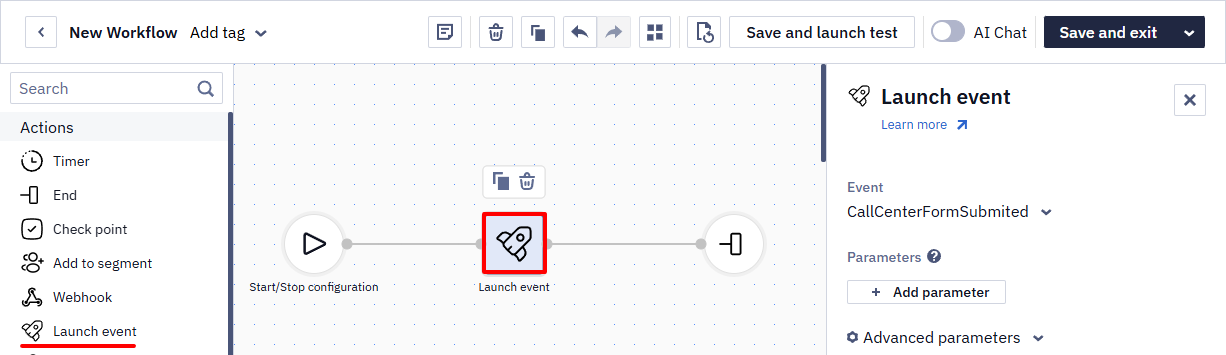
Basic Parameters
- Event (mandatory) — select the type of event to be triggered.
- Parameters — specify one or more
key–valuepairs that the system will pass to the event.
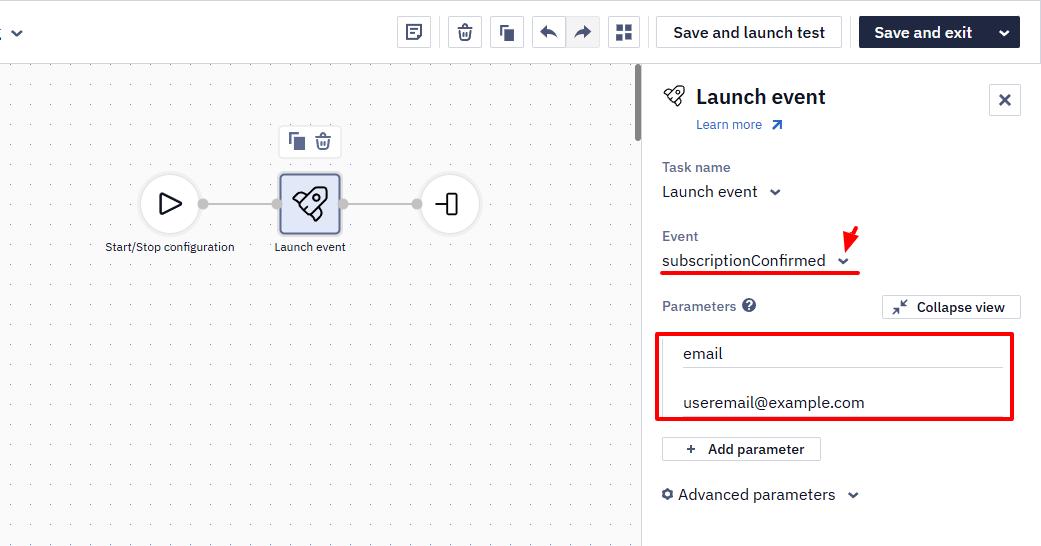
Click + Add parameter to create a new one, or Trash to delete it.
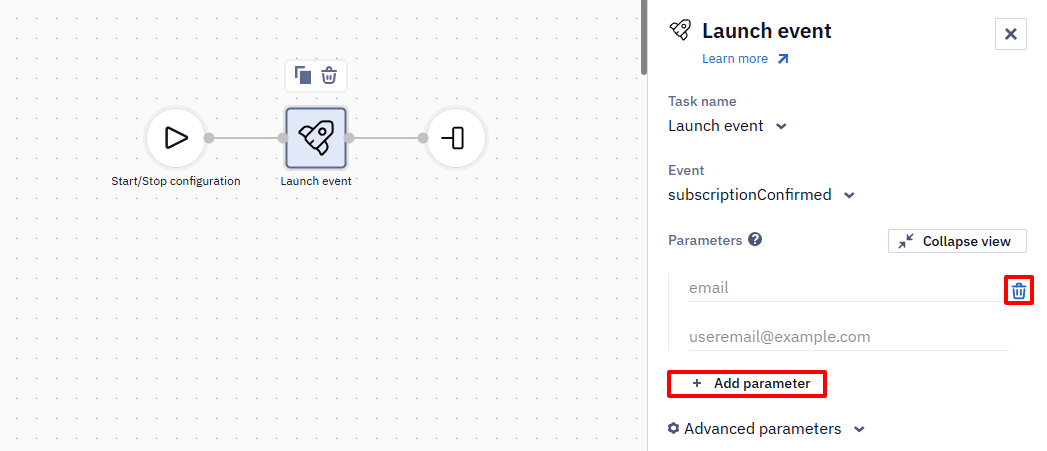
Variables are case-insensitive. For example, email and Email are considered the same.
Advanced Parameters (Optionally)
- Unique key — the identifier of the event to be triggered. For example, it can be a variable containing an email. If the field is left empty, the system uses the key from the event that triggered the current workflow.
- JSON — data in
JSONformat that are passed to the event if the corresponding parameters are not specified in the Parameters field.
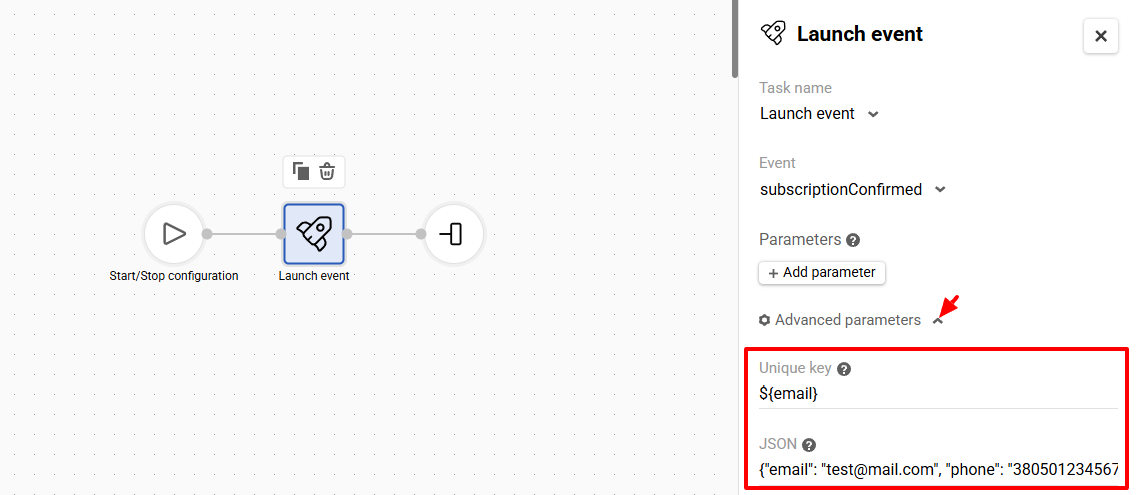
Two JSON formats are supported.
- Simplified JSON format
{ "paramName": "value" }.
Example:
{
  "city": "London",
  "street": "Bond Street",
  "contactId": "3089912515"
}- An array of
name–valuepairs.
Example:
[
  {"name": "city",   "value": "London"},
  {"name": "street",    "value": "Bond Street"},
  {"name": "contactId", "value": "3089912515"}
]
To access event parameters, use:
${event.data.parameter}— dot selector for nested parameters;${event.array[0].parameter}— index selector for array elements.
Parameter Priority
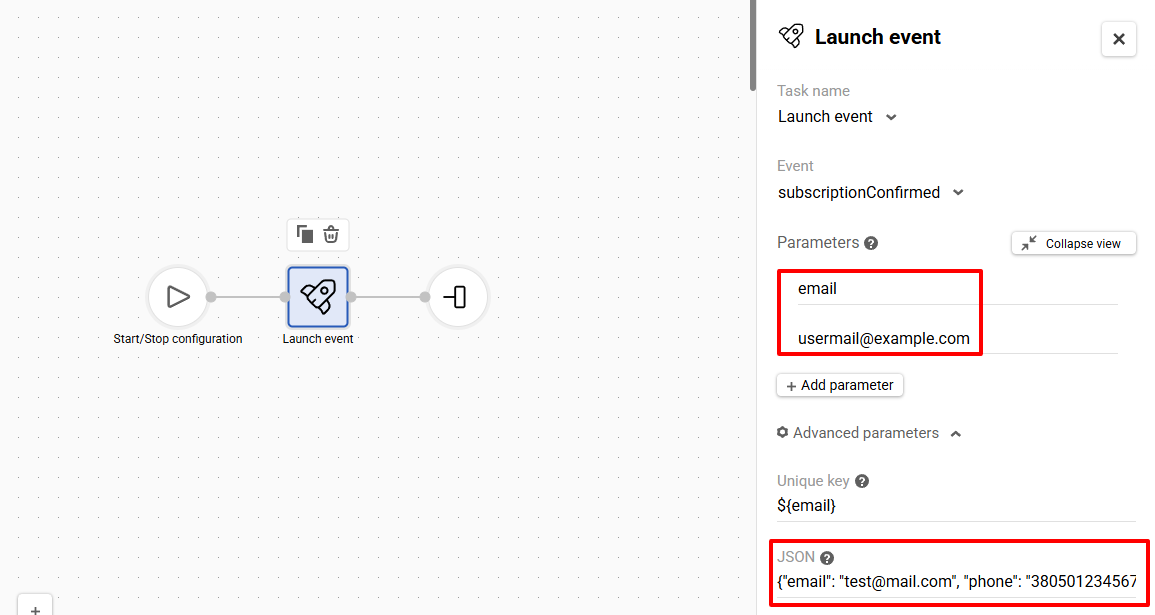
During block execution, the system merges the data specified in the Parameters and JSON fields.
If the same parameter is defined in both places, the system applies the value from the Parameters field, as it has higher priority. In the example below, the value [email protected] will be passed to the event.
Remove from Segment
The block is used to remove a contact from a selected segment.
The block has one basic parameter — Segment. In this field, select the segment from which the contact will be removed.
You can remove a contact only from a list segment. In the Segment selector, you can also create a List segment without leaving the workflow editor. After removal, the contact remains in the system.
Read about the use cases for advanced parameters in a separate article.
Update Custom Fields
Custom fields contain information about your contacts, such as the number of orders, favorite brands, etc. The Update custom fields block automates contact data updates. When this block is activated in a workflow, it updates the specified fields of the contact that goes through the workflow.
An event passed via the Generate event API method doesn't update contact fields by itself. To write event parameters to the contact's custom fields, add this block to the workflow triggered by the event and map the event parameters to the corresponding fields using dynamic variables.
The block updates the fields of any contact regardless of their subscription status — unsubscribed contacts included.
The block doesn't look up the contact itself — it takes the contact ID from the workflow context. If the event that started the workflow contained no identifier the system matches a contact by, the block doesn't update the fields and returns the Contact not found error. In this case, place a Get contact block before it: it finds the contact and writes the ID to the workflow context.
To add fields that need to be updated:
- Open the + Add field list and select the one you want to update or find it via search.
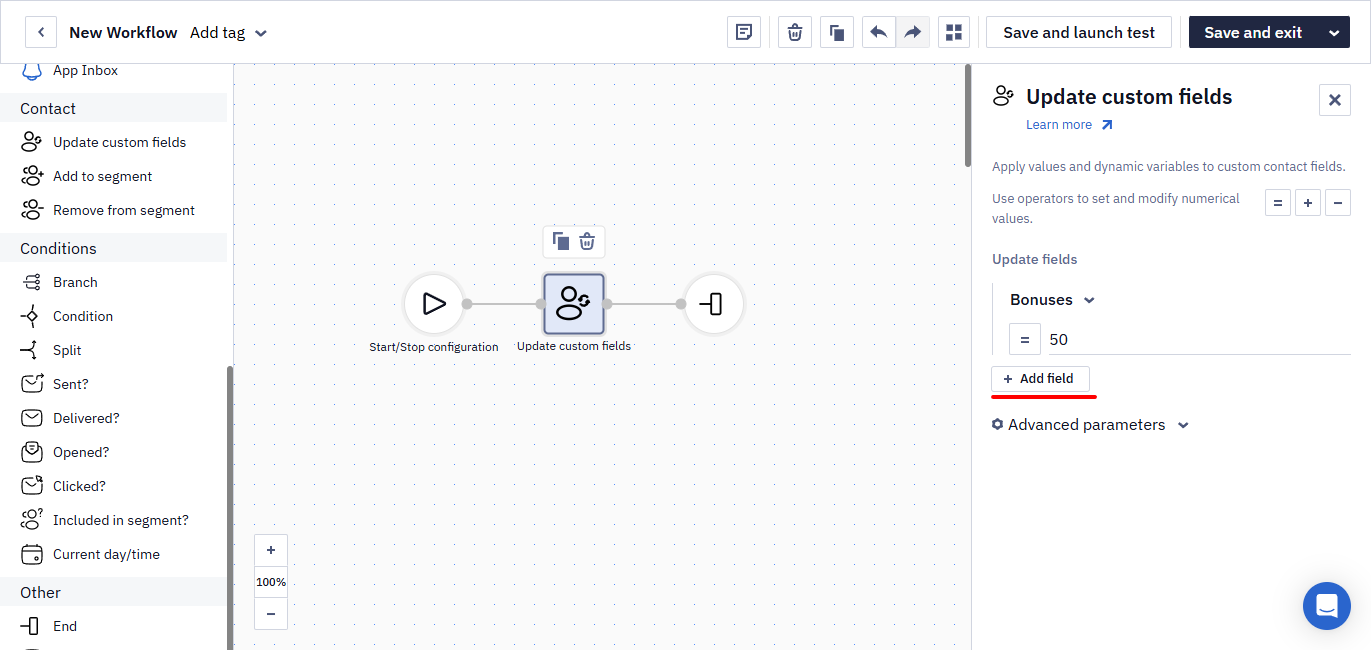
Custom fields are grouped into lists you create.
- Enter a static field value or a dynamic variable in the Value line.
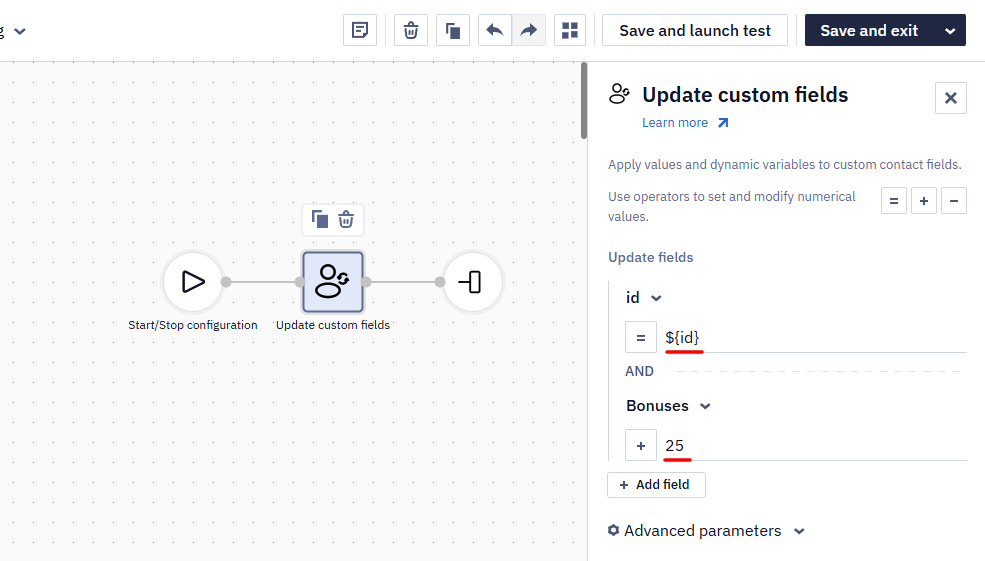
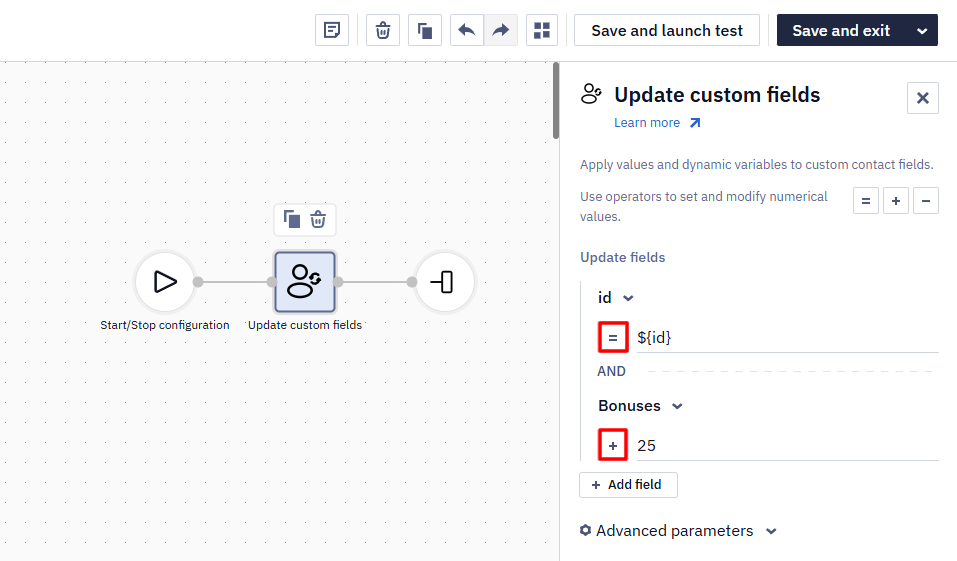
If the additional field type is numeric, select the operator:
=— the field will be assigned the value transmitted in the block;+— the value transmitted in the block will be added to the existing value in the field; if the result is greater than the maximum value of the field range, its maximum permissible value will be written.-— the value transmitted in the block will be subtracted from the existing value in the field; if the result is less than the minimum value of the field range, its minimum permissible value will be written.
- To add more rules, repeat steps 1 and 2.
- Save the workflow.
The system validates the added fields and their values. If validation fails, an error message is displayed.
Reference an event parameter by its name: $parameter for a value and $parameter[0].field for an item inside an array. The $event. prefix that the Start on Date block accepts does not work here — the block writes such an expression into the field as plain text.
To delete the created rule from the block settings, click the trash can icon.
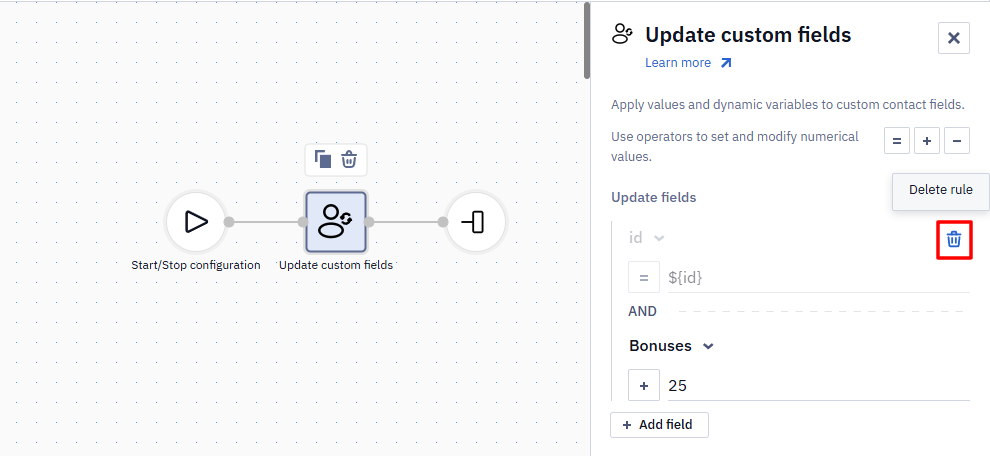
The block also contains advanced parameters, described in the Advanced workflow block parameters article.
For a one-off bulk update of a field — for example, to clear it for a large number of contacts — use the Add/update contacts API resource instead of a workflow: a workflow processing that volume runs slowly.
Create Contact
The block creates a contact in the system. If the contact with this email address already exists in the system, it will be updated. If not, a new contact will be created.
Use this block only when the contact data is passed via the API method Generate event, and only a part of the data needs to be specified when a contact is created. For example, you sent the event via Generate event for a new contact.
With this block, you add this contact to the system. For all other methods, this block is not needed.
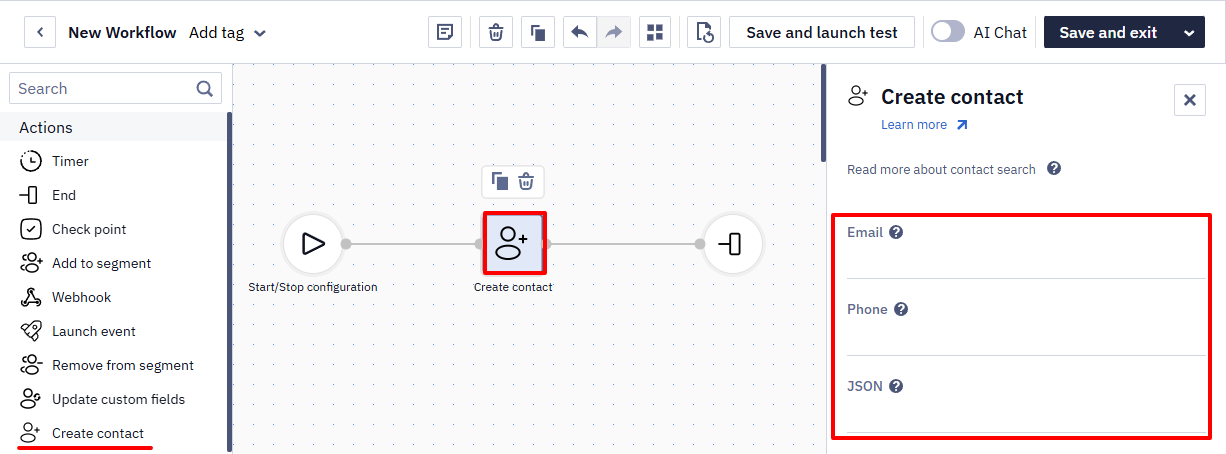
The block has 3 parameters:
- Email: required field if you create a contact by email.
- Phone: required field if you create a contact by phone number.
- JSON: field contains a line or a variable with a line in
JSONformat with contact data (phone number, name, surname, city, additional fields). Email address is specified by default; if needed, specify other additional data.
You can pass the contactJson variable in the JSON field. In this case, REST API will validate the values passed together with this parameter. In case of passing the contact's parameters with mistakes, the warning returns the invalid and valid values.
Request body for the JSON field:
{
  "firstname": "...",
  "lastname": "...",
  "sms": "...",
  "town": "...",
  "timeZone": "Etc/GMT+03",
  "languageCode": "uk",
  "FIELD_LIST_NAME": {
      "FIELD_NAME": "exampleValue"
    },
  "confirmed": false
}
where
FIELD_LIST_NAME— name of the list of additional fields;FIELD_NAME— name of the additional field;exampleValue— value of the additional field;confirmed- contact email address status (confirmed/unconfirmed)
To create an unconfirmed contact, add "confirmed":false to the request body
To create a contact with a value in the date field, use the format YYYY-MM-DD:
{
  "FIELD_LIST_NAME": {
      "DATA": "2023-11-06"
    }
}
To create a contact with a value in the date with time field, use the format YYYY-MM-DDThh:mm:
{
  "FIELD_LIST_NAME": {
      "DATA": "2023-11-06T16:42"
    }
}
You can access an additional field not only by name, but also by its ID. In this case, the format should be as follows:
{
  "profileInputs": [
    {
      "profileInputId": 10001,
      "value": "2023-11-06"
    }
  ]
}
When searching contacts for the Create contact, Update contact, Get contact, Confirm contact, and Delete contact blocks, the following rules apply:
- Contact ID has the highest priority among all parameters.
- If externalCustomerId is specified, contact search will be performed by externalCustomerId.
- If externalCustomerId is not specified, contact search will be performed by email address or phone number.
Delete Contact
This block is designed to automatically delete contacts from the database — for example, to help you stay within your pricing plan limit.
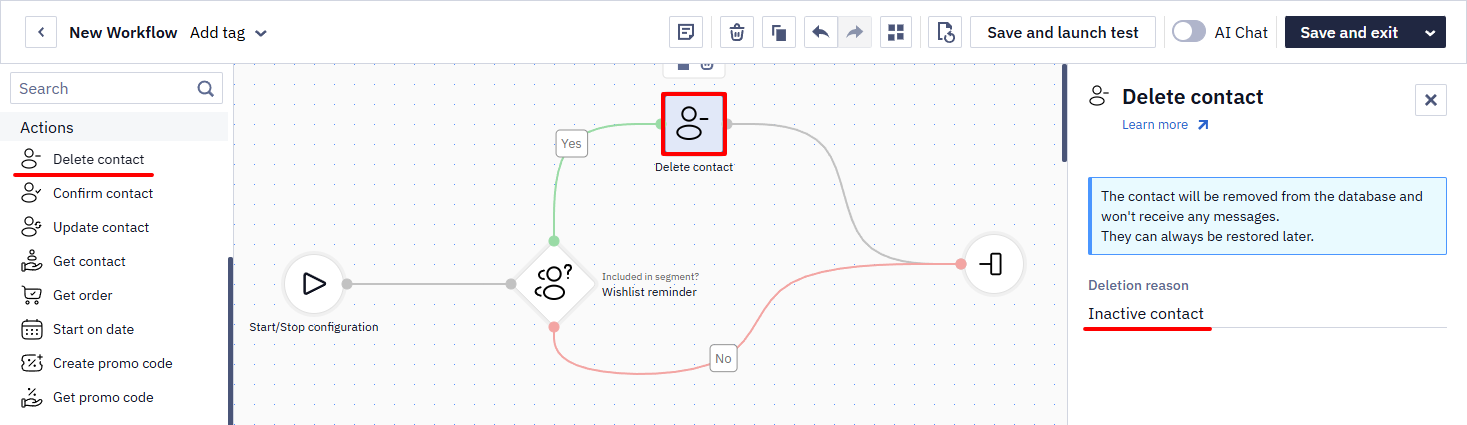
In the Deletion reason parameter, you can enter text that will appear in the list of deleted contacts (for example, Inactive contact). This field is optional.
A deleted contact can be restored.
Contact search follows the same rules as in the Create contact block: Contact ID has the highest priority, then externalCustomerId, email address, or phone number.
The Block Runs as Soon as the Contact Reaches ItA workflow moves a contact to the next block as soon as the previous one finishes its own job. Sending blocks, for example, finish the moment the message goes out — not when the contact opens it or clicks a link. So if you place Delete Contact after one of them, that action runs immediately.
If you need to delete contacts after a campaign, give recipients time to react first:
- Add a Timer before Delete Contact to hold every contact for a fixed period.
- Or add Opened? or Clicked? with Wait for status enabled, and place Delete Contact on the No path. The contact is then deleted only if the status has not appeared within the maximum wait time.
Confirm Contact
The block confirms the email address of the subscriber, adds them to the system and makes them available for receiving campaigns.
For example, a person fills in a subscription form, their email address gets to the system and they receive a confirmation email. They can not receive promotional campaigns until they confirm subscription. A successful confirmation link triggers the Confirm contact block and starts the corresponding workflow.
If the contact is already confirmed, the block changes nothing, and the workflow continues.
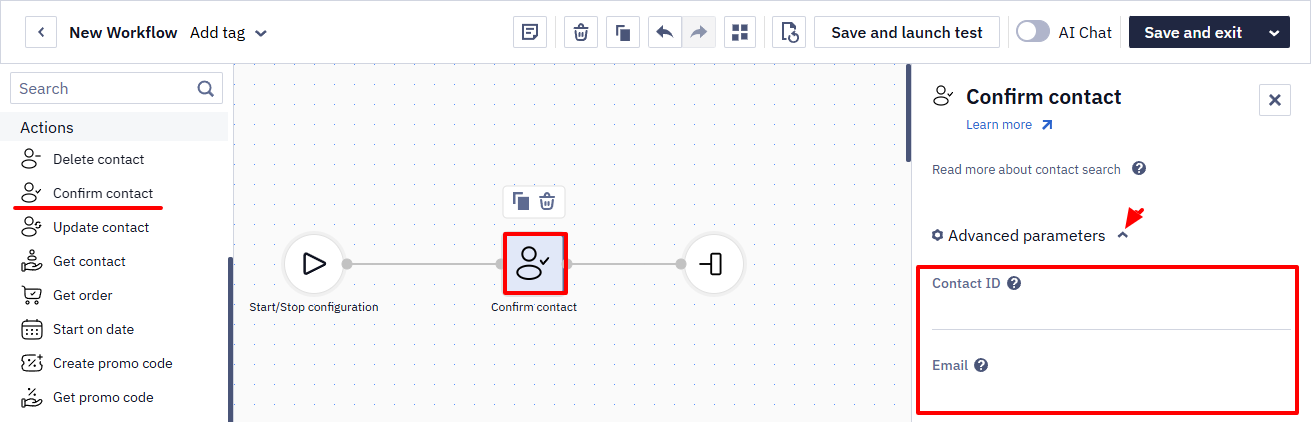
The block has Advanced parameters.
Confirm contact is meant to fire after the user has followed the confirmation link. Don't place it at the start of a workflow just to bypass an "unconfirmed contact" error — that confirms contacts without any proof of consent. The correct practice is a confirmation email plus a separate confirmation workflow. For EU recipients, consent to promotional communication must be a separate, explicit action.
More about advanced workflow block parameters >
Contact search follows the same rules as in the Create contact block: Contact ID has the highest priority, then externalCustomerId, email address, or phone number.
Update Contact
The block updates the contact information. If the contact exists in the system, their info will be updated; if the contact doesn't exist, the system will skip them.
Use this block to update the contact data from an event sent via the API method Generate event, or to set a fixed value of the additional field in the workflow.
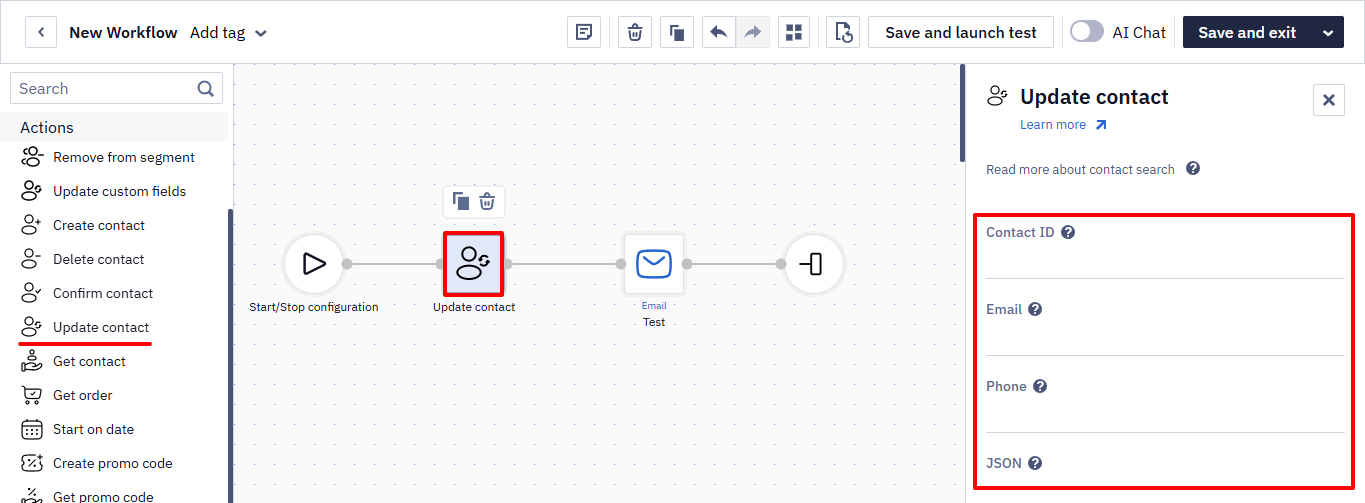
The block has 4 parameters:
- Contact ID: contact ID in the system. If you want to update a contact not by email but by ID in the system, specify the name of the variable that contains the contact ID. For example,
${contactId}or123345. - Email: required field. For example,
${emailAddress}or[email protected]. If your event has a different variable, specify it in the field. In the system events, the variable is called EmailAddress. System events are the events generated within the system (click on an email CTA, regular workflow launch, filled subscription form, reactivation with RFM analysis). For them, enter${emailAddress}in the field. - Phone: required field if you update a contact by phone number. For example,
${phoneNumber}. If you have a different name for the variable in the event, specify it in the field. - JSON: field contains a line or a variable with a line in JSON format with contact data (phone, first name, last name, address, country, city, region, zip code, additional fields). Email address is specified by default; if needed, specify other additional data. The parameter confirmed is ignored.
Contact search follows the same rules as in the Create contact block: Contact ID has the highest priority, then externalCustomerId, email address, or phone number.
Get Contact
The block gets contact data and passes it to the message or to a Conditions block. For example, you want to send a notification email with contact data every time a new subscriber is added to the database, or send the subscriber registration details after registration.
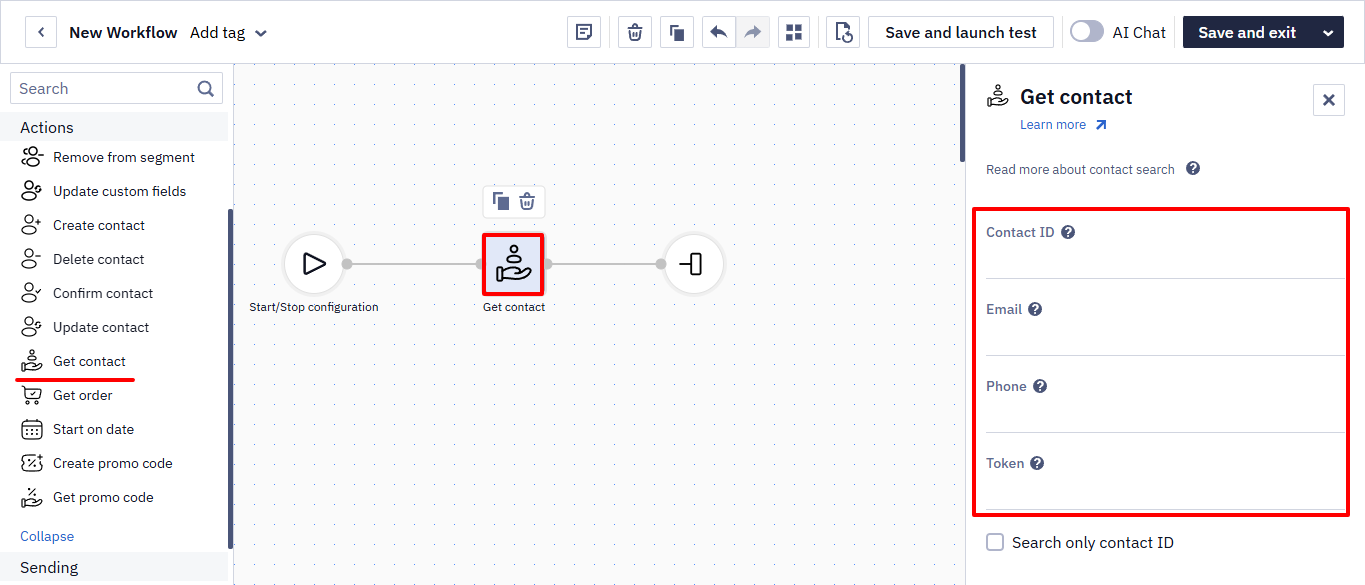
The block works as follows:
- The event that contains contact data is created (registered) in the system.
- The block extracts out all available contact data stored in the database.
- Block passes this data to the message.
The block has 4 parameters:
- Contact ID: contact ID in the system;
- Email: email address of the contact;
- Phone: phone number of the contact;
- Token: mobile token of the contact.
Email, Contact ID, Phone, and Token are used to identify a contact. One of these fields must be filled with relevant data.
For example, if you want to identify a contact not by email but by ID in the system, specify the name of the variable that contains the contact ID. By default, it's ${contactId}.
You can use these variables in the message:
$!firstName- name;$!lastName- surname;$!email- email address;$!sms- phone number;$!contactKey- contact key;$!id- contact ID in the system;$!createdDate- creation date;$!updatedDate- date of the last contact update;$!confirmed- contact's email address status (true - confirmed, false - not confirmed);$!fields['1234']- additional fields. Insert an ID of the additional field instead of 1234.
To check the value of a specific custom field afterward, reference $!fields['1234'] (or the smartMessageJson variable) in a Check values or Variable matches regular expression condition block placed right after Get Contact.
NoteIf the field you're checking was just updated earlier in the same workflow (or by another near-simultaneous process), add a short Timer (about 1 minute) before Get Contact. Reading the field immediately after the update can return the stale, pre-update value.
For Get contact block, you can activate the Search only contact ID checkbox to search contact only by contact ID.
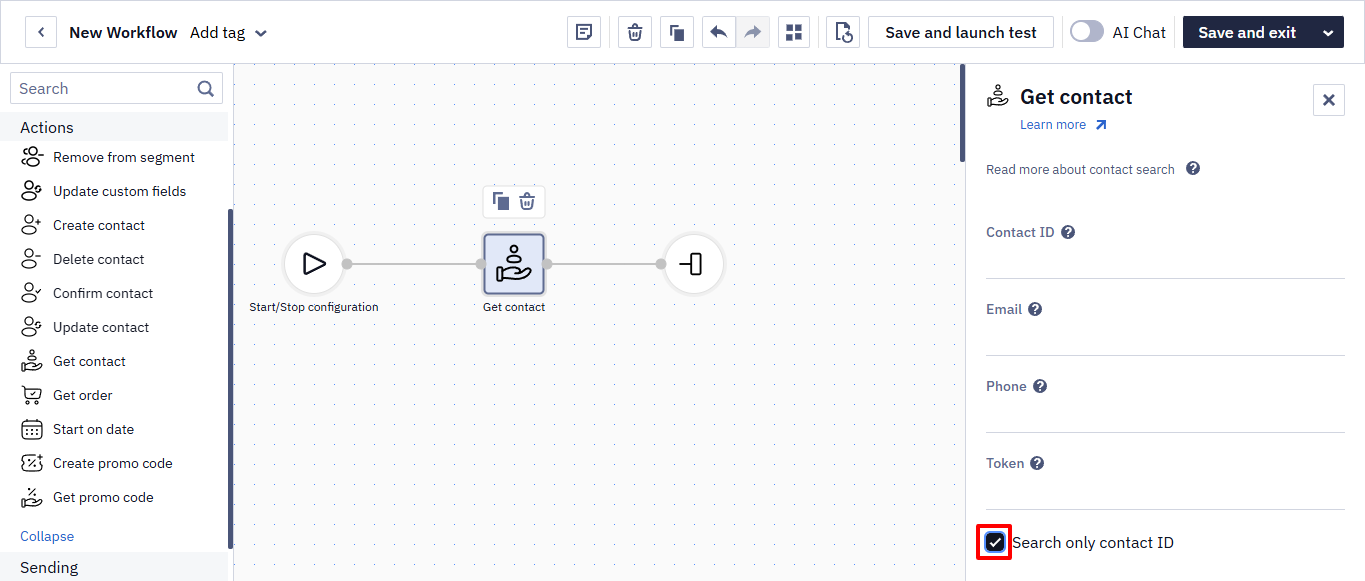
Contact search follows the same rules as in the Create contact block: Contact ID has the highest priority, then externalCustomerId, email address, or phone number.
Get Order
The block extracts the data from an order and passes it to the message. For example, order status – order confirmation, order delivery.
Use this block only if you send the order data to our platform using the Add orders API method.
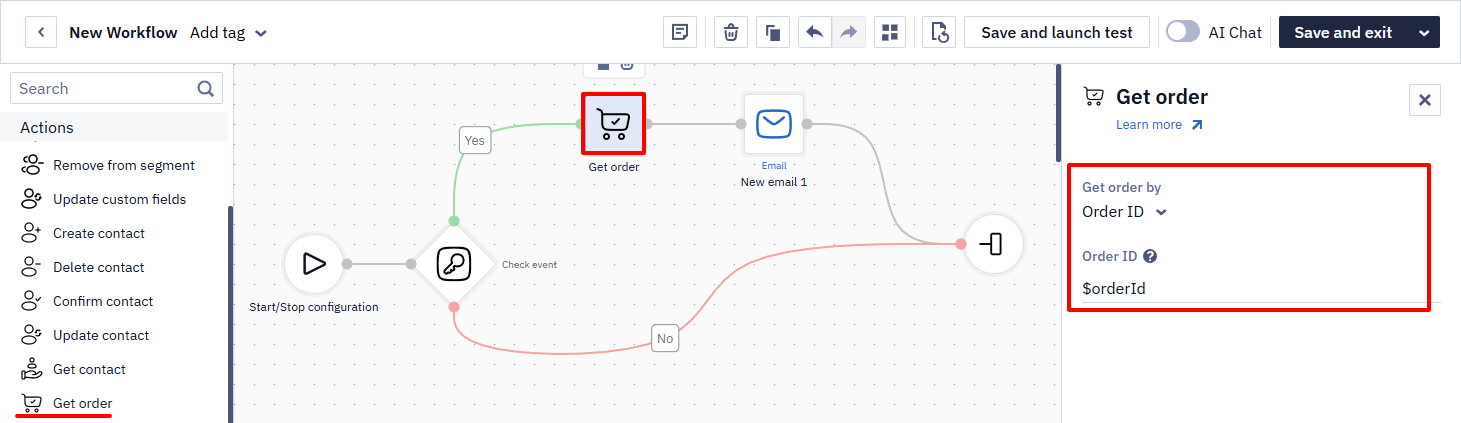
To configure the Get order block:
Click the Get order by dropdown list and select one of the following options:
- Order ID. Choose this option when you wish to get the order data by the ID generated by our system.
- External Order ID. Choose this option when you wish to get the order data using the order ID that you pass to our system.
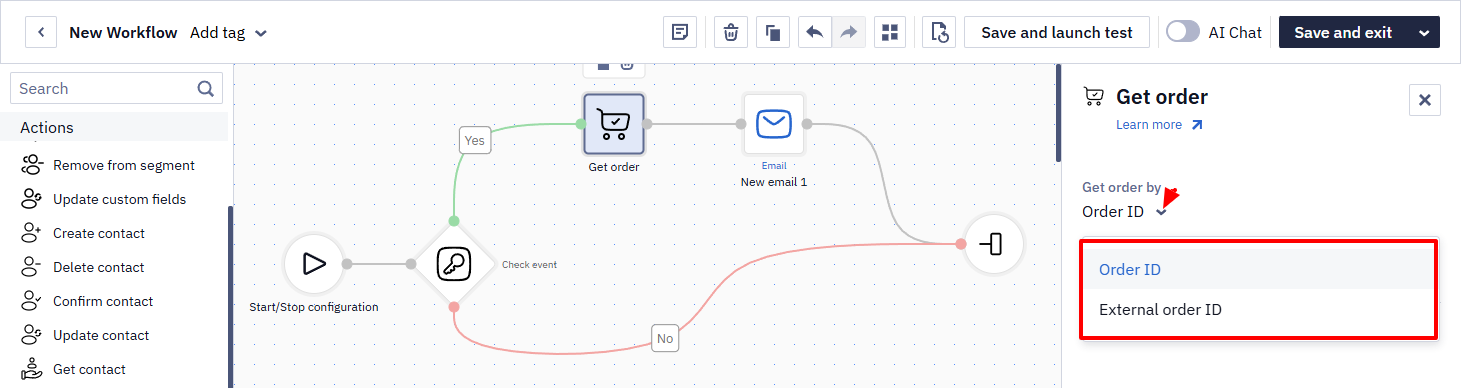
You don't have to fill in the Order ID/External order ID field. The block extracts automatically all the parameters from the order event.
The block works as follows:
- The system receives the order information.
- The block receives all data passed with the order and stores it in the workflow context. This data can then be used throughout the workflow — for example, as variable values in messages.
Read more about the block in the Order automation article.
Start on Date
The block is used to send a message:
- before X days/hours/minutes before the date and time you send in the event;
- with the start time you send in the event or set manually;
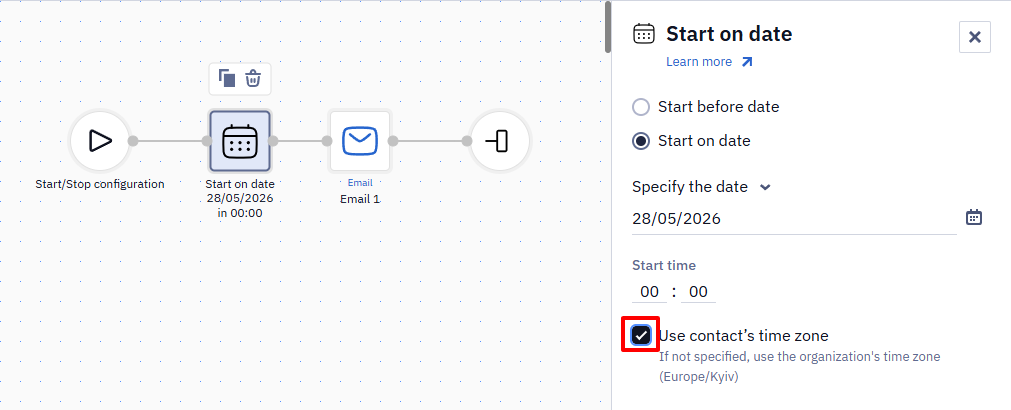
- on date from an event parameter or specified in a block.
Note
- If the start time is taken from the event, the transferred time zone is applied.
- If the start time is set manually, the block will start in the account time zone, set in your general Settings.
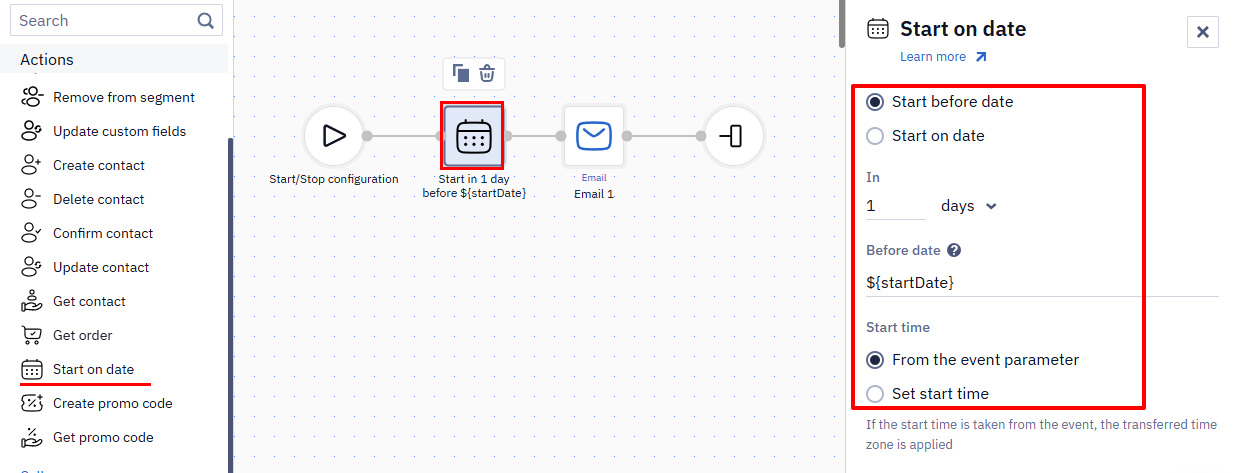
In the In field, specify when before the date to send the message: 1 hour, 3 days, 10 minutes, etc.
In Before date, you can take the required date from the sent event. In the box below insert the parameter name from the event, for example, ${starDate}.
If less time remains until the target date than the interval set in the In field at the moment the workflow starts, the block fires immediately, without waiting. For example, if the block is set to start 3 days before the date, and the workflow starts 1 day before it, the contact proceeds to the next block right away.
The supported format for the date and time is YYYY-MM-DDThh:mm:ss+hh:mm, for example 2011-12-03T10:15:30+02:00.
The UTC offset is the difference in hours and minutes from UTC for a particular place and date. UTC+02:00 is used in some countries of Central Africa Time, Eastern European Time, and South African Standard Time. See the full list here.
To access nested parameters, use:
- dot selector —
$event.data.parameter - index selector —
$event.array[0].parameter
Activate the Use contact's time zone parameter to send a message at a specific time, taking into account the contact's time zone.
Create Promo Code
The block generates a promo code and passes it to a message that goes next in the chain. The algorithm encrypts the parameters by your key, and the reverse algorithm decrypts it when a promo code is entered on the website. Learn more.
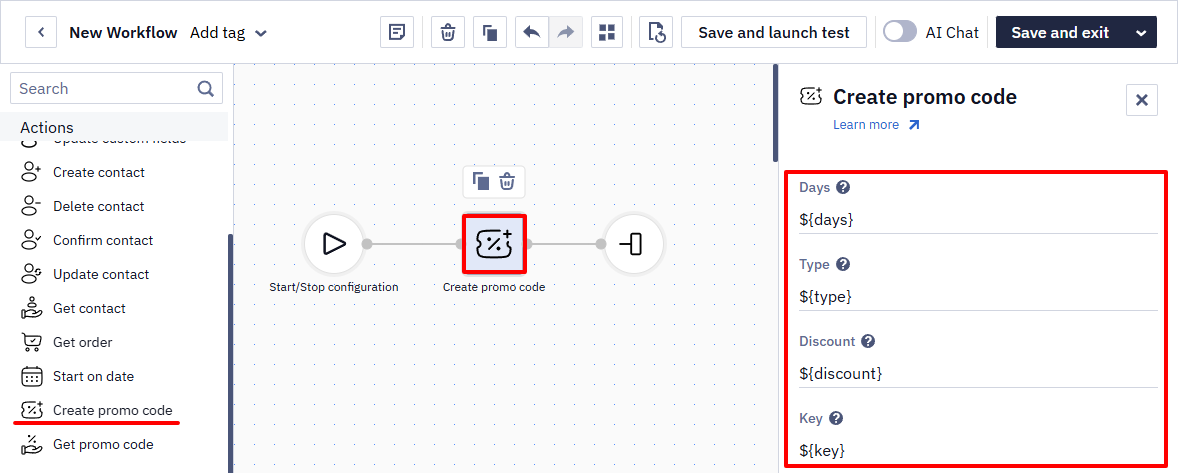
The block has 4 parameters:
- Days: number of days until the promo code is expired. The system will add them to the current date, and the resulting expiration date will be encrypted into the promo code. The variable
${days}is specified by default. - Type: promo code type. You can set up 32 promo code types. For example, assign type 0 to a subscription promo code, type 1 to a birthday code, type 3 to reactivation code, etc. Pass in the variable the number from 0 to 31 that corresponds to the right type. The variable
${type}is specified by default. - Discount: size of the discount. Used to generate a promo code when a discount is given as a % off the order cost. It is always a double-digit number, so discounts of up to 10% should go with zero ahead. For example, specify 05 for an email with a 5% discount. The variable
${discount}is specified by default. - Key: encryption key. You can leave the default value. The variable
${key}is specified by default.
All parameter fields are required.
In a workflow, this block is followed by one of the Sending blocks (Email, SMS, Viber, etc.).
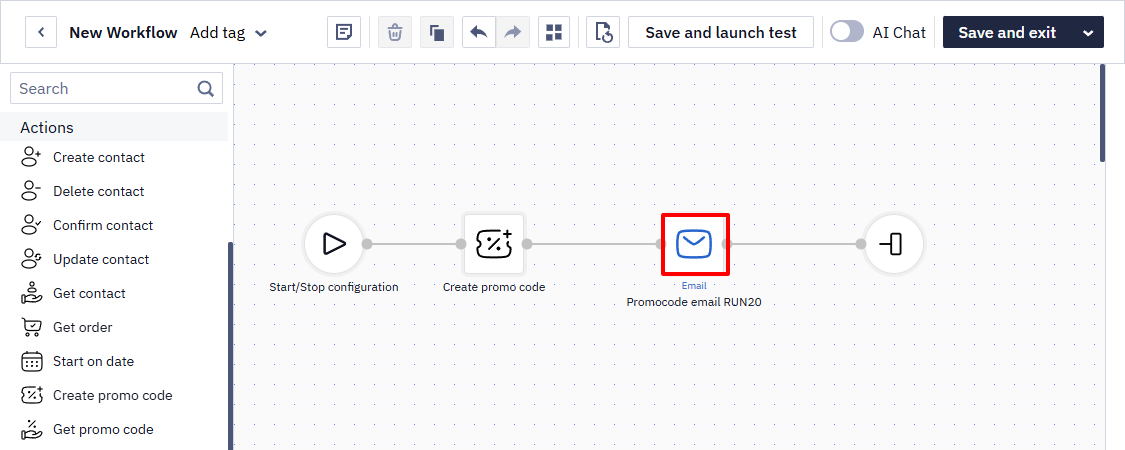
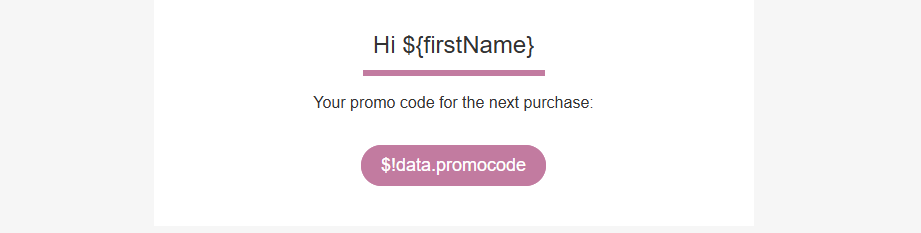
For example, in the email template, you can put a variable $!data.get('promocode') (or $!promocode) in the place intended for a promo code.
Get Promo Code
The block passes a promo code from the base to the message. More about uploaded promo codes.
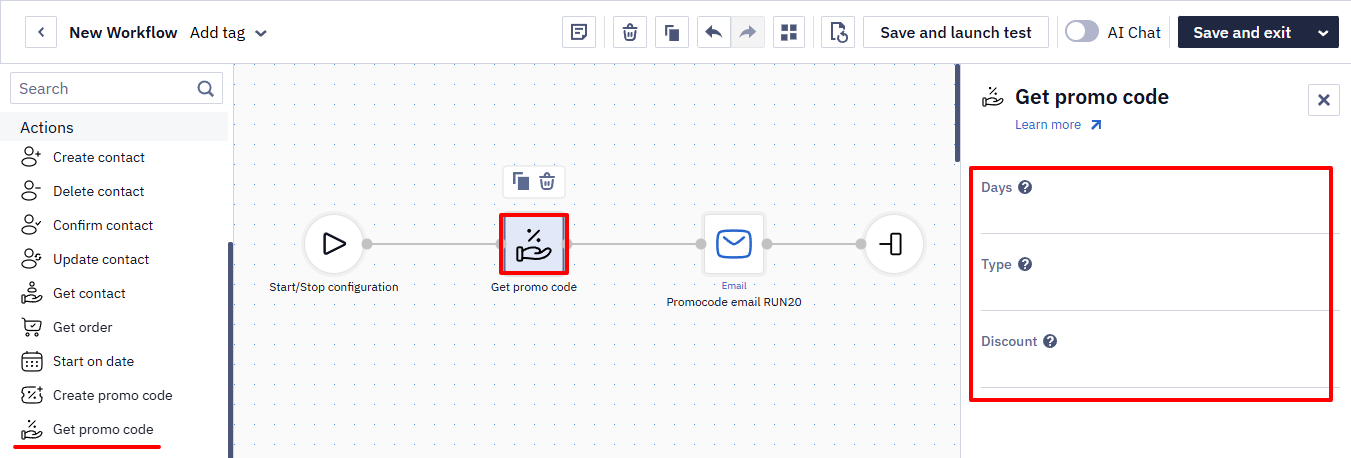
The block has three required parameters:
- Days: number of days after the current date during which the promo code is valid;
- Type: promo code type;
- Discount: discount size from 01 to 99.
The system selects promo codes from the downloaded database based on the specified parameters.
Let's look at an example. Enter the following values in the parameters: days - 10, type - newyear, discount - 25.
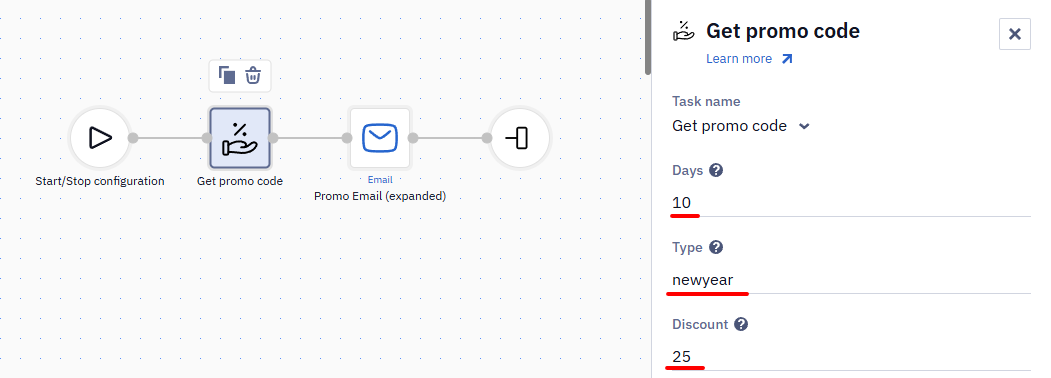
The workflow will extract from the database a promo code with a 25% discount, identified by the type newyear and having a validity period of at least 10 days. If several promo codes meet the specified parameters, the system will automatically choose one of them.
After the Get Promo Code block, you place one of the Sending blocks (Email, SMS, Viber, etc.).
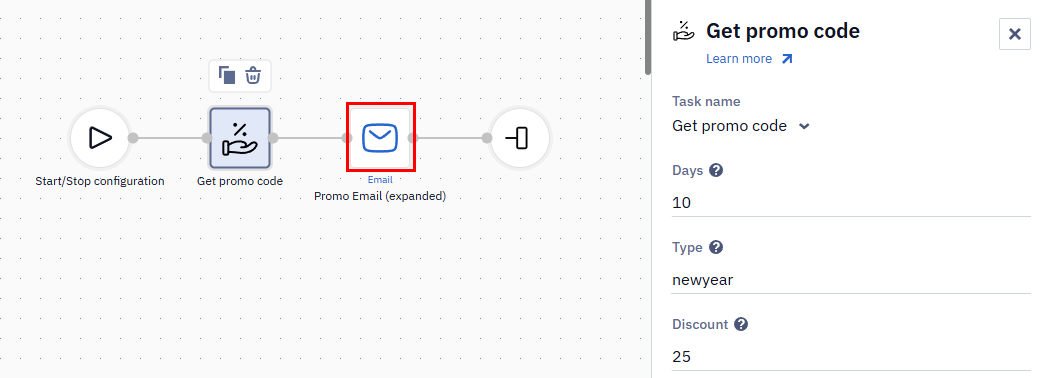
In the email template, put a variable $!promocode in the place intended for a promo code.
In mobile push messages, the $promocode notation doesn't work — insert the promo code with the full getter syntax instead:
$!data.get('promocode')Updated 1 day ago