
Introduction to Workflows
A workflow is a set of automated actions that occur according to specified conditions with a particular marketing purpose.
You can use workflows to segment your audience and send different campaign types, such as welcome series, birthday congrats, order confirmation, reactivation, etc.
There are 3 types of workflows:
- Triggered workflows launched by the event.
- Regular workflows launched for the selected segments based on the specified conditions.
- Workflows launched by the change in the contact's profile.
In Yespo, we use a drag-and-drop builder to create workflows. It is a constructor that uses blocks — the tasks and conditions that you can add to a workflow.
Workflow Editor Layout
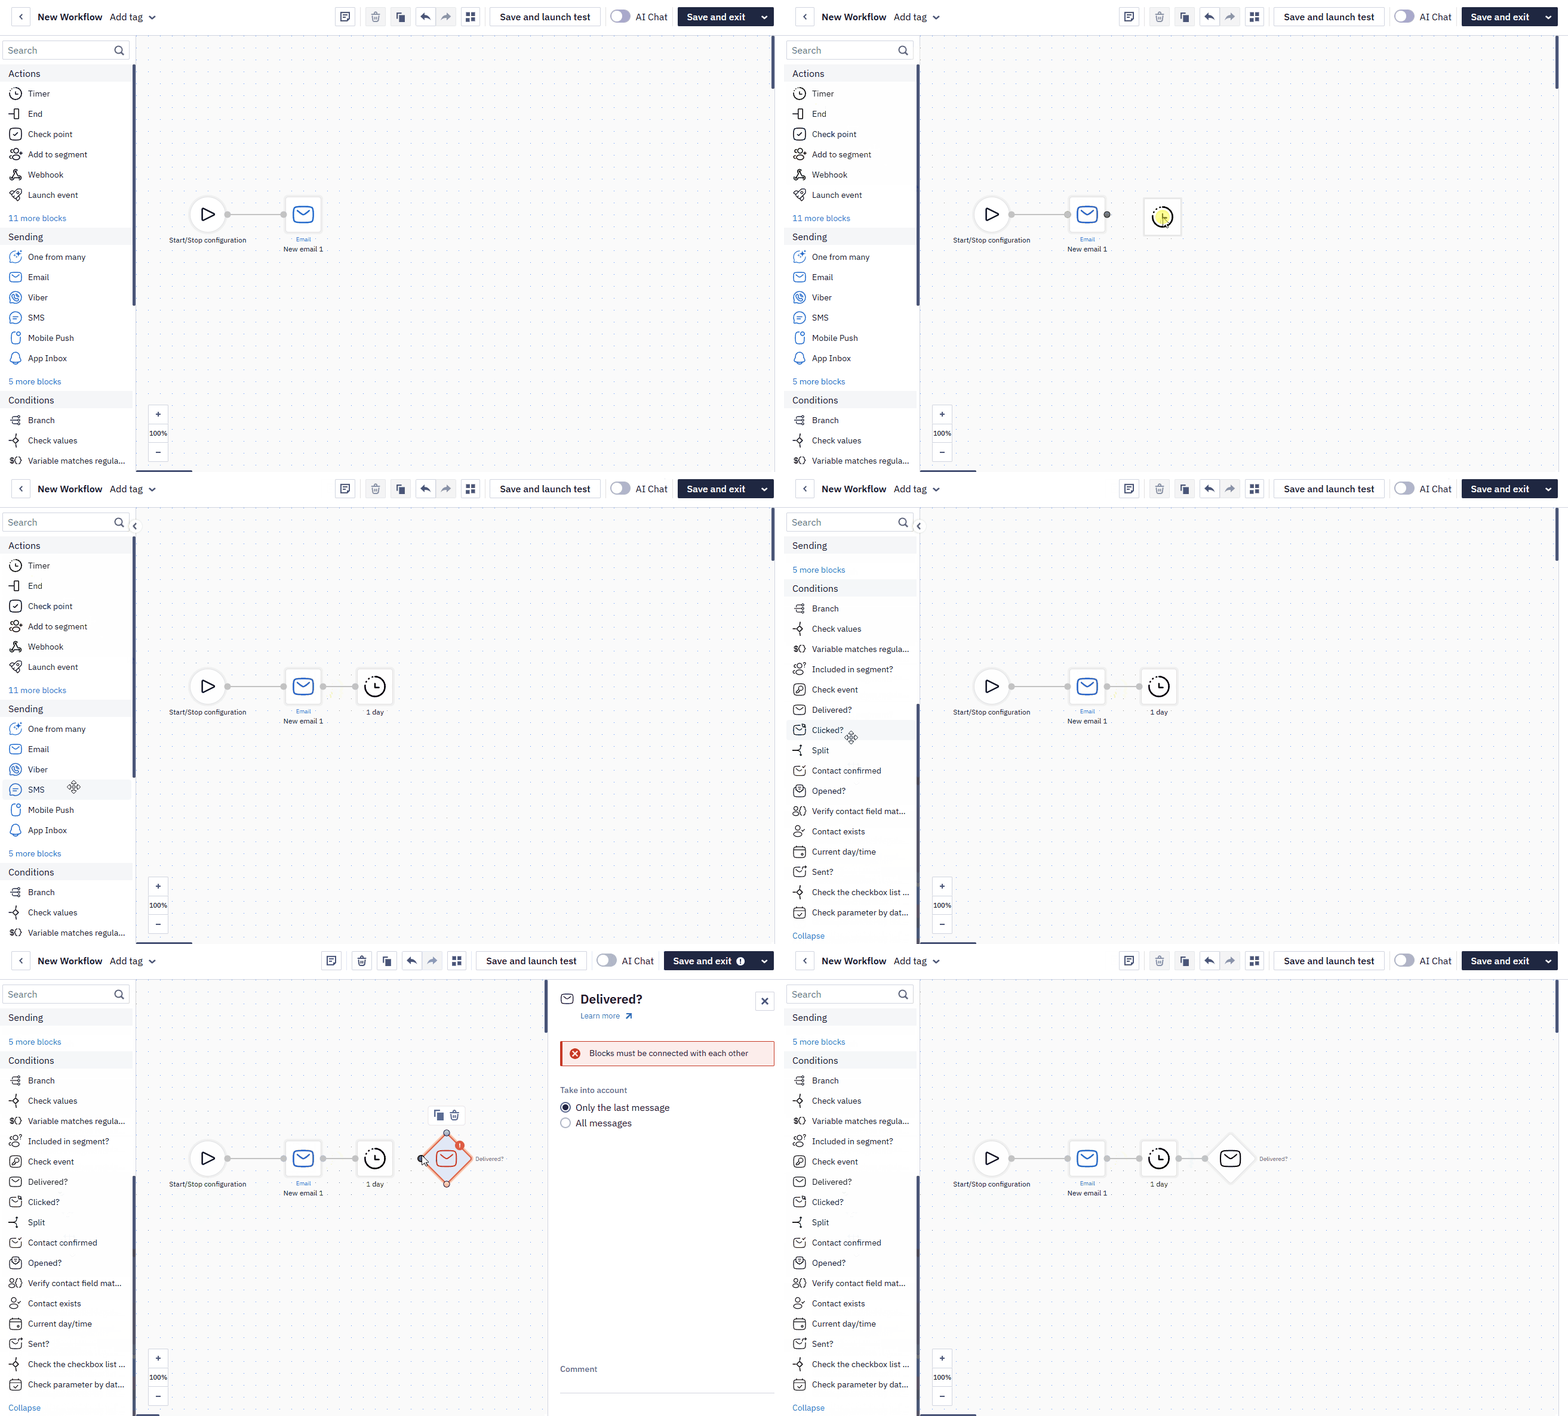
The Workflow Editor consists of four main areas:
- Top toolbar — rename the workflow and add tags, view or edit the workflow description, delete/duplicate a block, undo/redo actions, open the workflow preview, run a test launch, toggle the AI Chat assistant, and save the workflow.
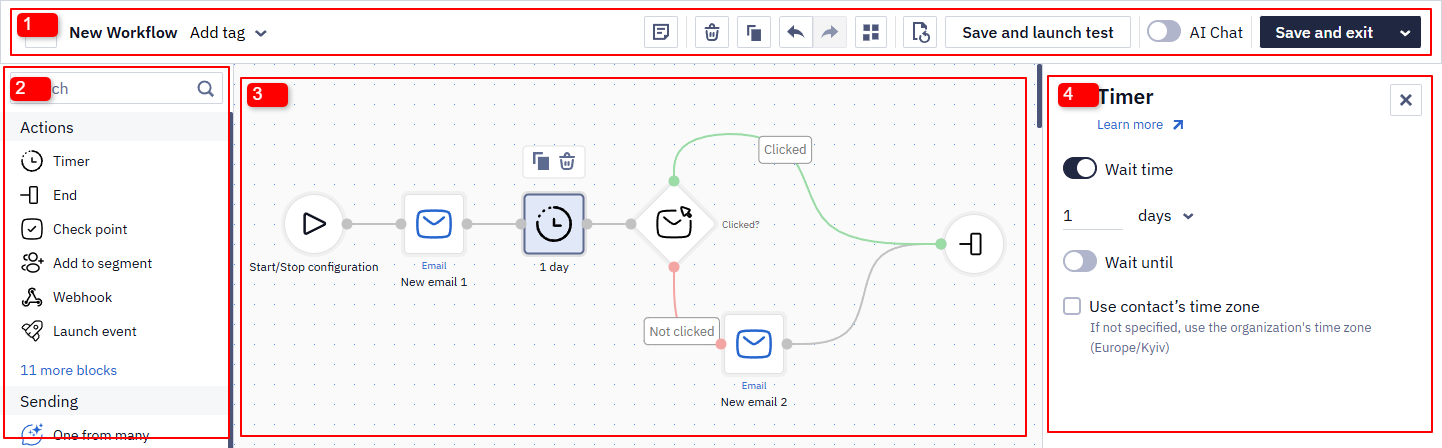
- Block panel (left) — search for a block by name, or browse the Actions, Sending, and Conditions groups described below.
- Canvas (center) — the workspace where you drag blocks and connect them into a workflow. Use the zoom controls in the bottom-left corner to adjust the view.
- Settings panel (right) — appears when you select a block on the canvas, letting you configure its parameters. Learn more about the settings of each block in the instructions for its block group.
Read more about building and editing workflows >
NoteBefore fully activating a workflow, you can test it on a single contact, event, or segment using Save and launch one time from the save dropdown — see Building and Editing Workflows for details.
When launching for one contact, pick the contact from the list or enter its internal
contactId— the external identifier is not accepted there.
Workflow Blocks
Workflow blocks are divided into the following groups:
Control workflow execution and checkpoints, manage contacts, work with promo codes and orders, and integrate workflows with external services.
Deliver a message to a contact through a specific channel, including transactional sends and multi-variant testing.
— check a contact's data or behavior against a rule and route them down a matching path; most blocks split into two paths (Yes/No), while Branch and Split route into more.
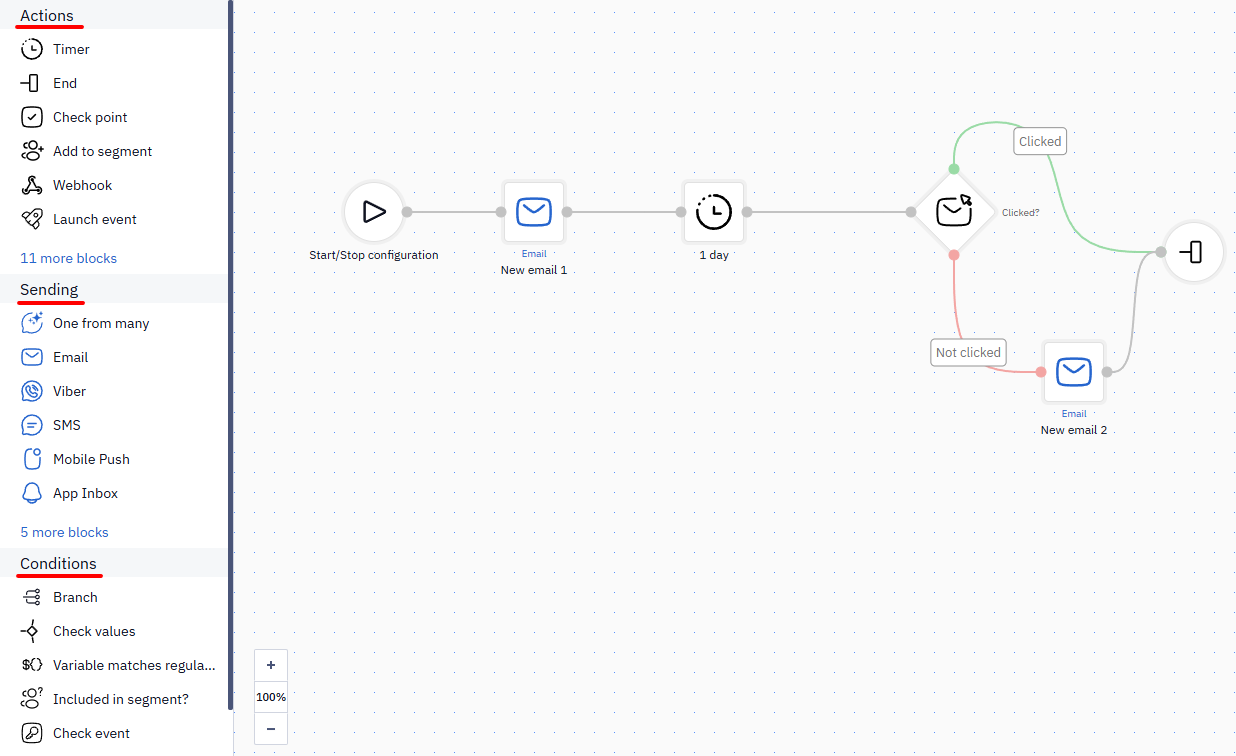
And Start block — not included in any group. It automatically appears in a new workflow by default.
Supported Data Access Formats in Workflow Blocks
All workflow blocks allow you to retrieve data from additional contact fields using the following case-insensitive access formats:
-
data.get('fields').get('1234') -
data['fields'].get('1234') -
data['fields']['1234'] -
data.get('fields')['1234'] -
fields.get('1234') -
fields['1234']
In addition to ${parameter}, you can use the following variable formats in all blocks that support value validation:
${event.data.parameter}— a dot selector for nested parameters;${event.array[0].parameter}— an index selector for array elements.
ImportantIn any workflow block parameter, variables can be referenced using both formats:
- With curly braces —
${date}- Short format (without braces) —
$dateBoth formats correctly substitute variable values in block parameters.
Workflow Context
Workflow context is a set of data about the contact and their behavior within a specific run: who the user is, which event triggered the workflow, and what additional data was received during its execution (for example, from a webhook).
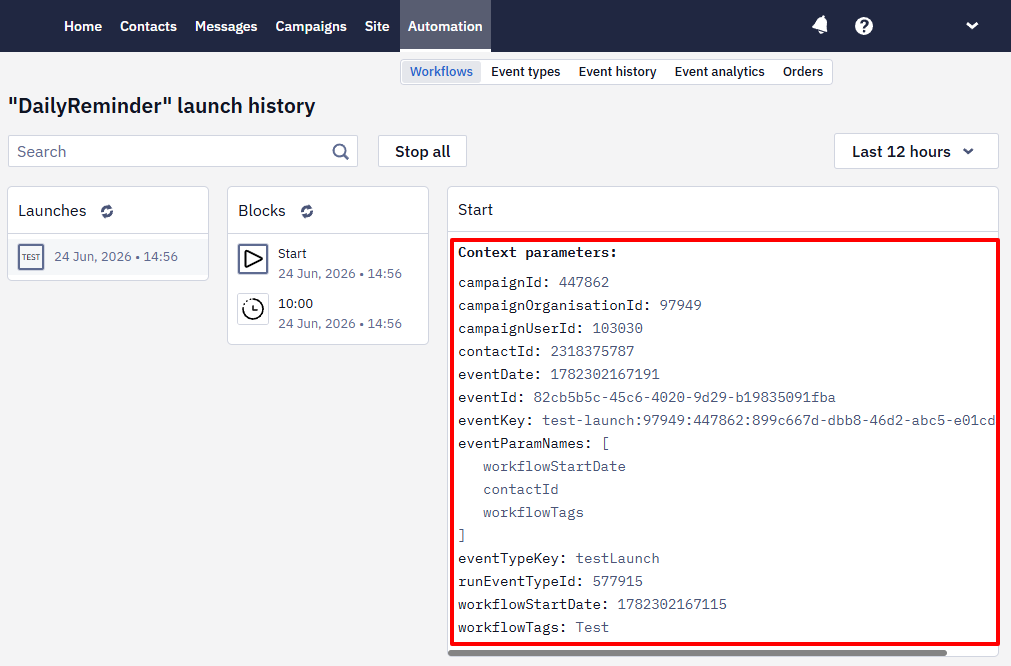
Full access to the context in every block enables the workflow to respond to data in real time: you can personalize messages, build conditional branches, insert promo codes/links/order totals, and update contact fields without manual work — right when the user takes action.
The following types of context data can be distinguished:
-
Contact fields: information from contact cards, such as demographics, loyalty level, or preferences.
-
Event parameters: detailed information about the event that triggered the workflow — a list of products and the order amount, a promo code, etc.
-
Event string data: JSON passed as a string with the event, for example,
"{\"coupon\":\"SAVE10\",\"checkoutLink\":\"https:\/\/site.com\/checkout?cart=CART-98213\"}". -
Webhook response parameters: data received via webhooks from external sources, such as a personal promo code or authorization token.
-
Order data: purchase details or order history.
All workflow context data is available in its blocks. For example, to write the promo code used in the workflow to a contact card, you need to:
- After the Get promo code block and the timer for data processing, add the Update custom fields block. Specify the required field and use a context variable, such as
$contactId, to identify the contact whose profile should be updated.
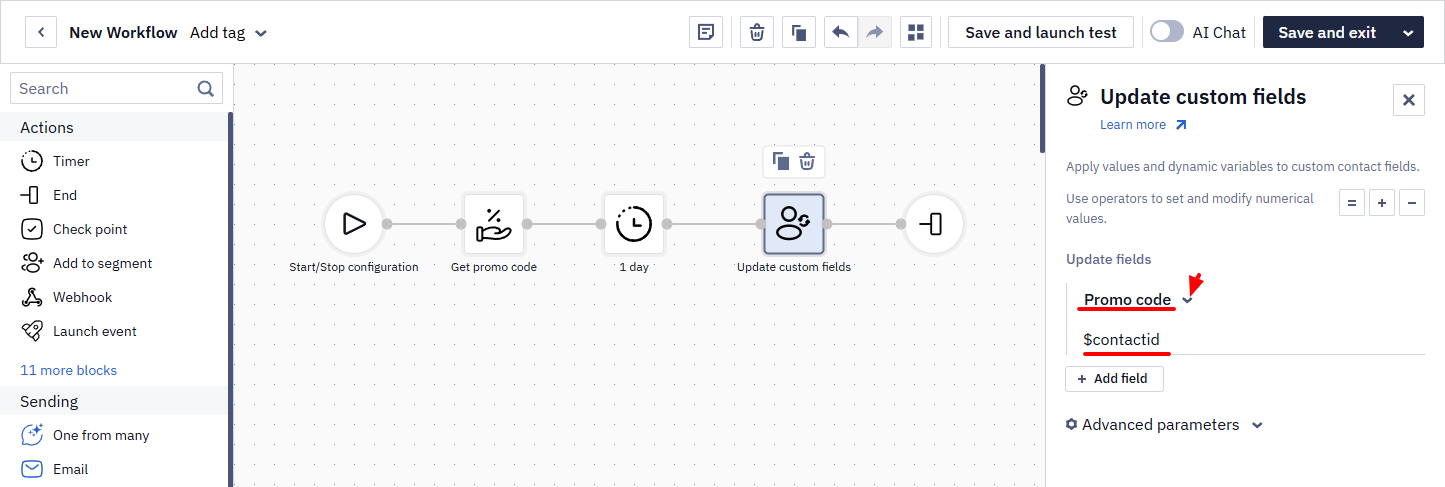
- After the Get promo code block and the timer for data processing, add the Update custom fields block. Specify the required field and use a context variable, such as
As a result, the promo code used in the first workflow will be written to the contact profile.
NoteEach type of workflow context data can be used for personalization and segmentation, allowing you to adapt your communication strategy in real time based on user behavior.
Allowed Send Time Settings
Allowed time settings can increase the likelihood of a quick response to the campaign and communicate with subscribers at the most convenient time for them.
Workflow Examples
This section contains instructions for setting up the most common automatic workflows: subscription confirmation, welcome series, abandoned carts and views, etc. Read more >
Workflow limitsYour CDP plan defines how many workflows can be active simultaneously and how many runs are available per billing period. When the limit is reached, new runs will not start, and the event history will show a corresponding error.
If a plan change leaves more active workflows than the new limit allows, the extra workflows aren't paused — their runs fail.
Updated 9 days ago